

Want to hide your WordPress site from the public while you build, test, launch, or update it? You can restrict access to your WordPress website with built-in settings, password protection, maintenance mode, hosting controls, or server-level authentication.
However, hiding your site from search engines is not the same as blocking public access:
- The Discourage search engines from indexing this site setting tells search engines not to index your website, but visitors can still access it with the URL.
- Password protection restricts access to protected content and prevents visitors from viewing it without the correct password.
- Maintenance mode displays a temporary page to visitors while you work on the site.
- Server-level restrictions can block access based on authentication or IP addresses but require access to your hosting or server configuration.
Some methods protect individual pages, posts, or other content, while others restrict the entire WordPress site. This guide covers seven ways to hide a WordPress site from the public, starting with simple no-plugin options and moving to password protection, maintenance mode, hosting controls, and server-level access restrictions.
Hiding Your Site From Google vs. Blocking Public Access
Before choosing a method, decide whether you want to hide your WordPress site from search engines or prevent visitors from accessing it.
A noindex directive addresses search visibility. It tells search engines not to include a page in their search results, but it does not prevent someone from visiting the URL.
Password protection, authentication, IP restrictions, and private WordPress content use access controls instead. These methods restrict who can view the protected content.
If you are working on a new website, you may need both: an access restriction to keep visitors out and appropriate indexing controls to prevent search engines from indexing temporary content.
Why You Might Need to Hide a WordPress Site
A few situations come up more often than others:
- Development and redesigns. Half-finished pages, broken layouts, and placeholder content do not need public access while you work on the site.
- Membership and internal content. Company wikis, client portals, private resources, and members-only content should remain accessible only to authorized users.
- Pre-launch content. If your copy, pricing, product details, or positioning is still in draft form, you may want to restrict public access until launch.
- Client and stakeholder previews. You often need to show progress to one or two people without opening the site to everyone else.
- Staging environments. A staging copy of a live site is one of the easiest places for sensitive work to leak if it isn’t locked down.
The right method depends on which of these applies. A site under active development needs something different from a finished membership platform.
7 Ways to Hide Your WordPress Site From the Public
There are several ways to hide your WordPress site from the public, depending on whether you want to block all visitors, keep specific pages private, or temporarily restrict access while you work on your site.
Not all methods below provide the same level of privacy. Some prevent search engines from indexing your site, while others actually restrict visitors from accessing your content.
Below are seven practical methods to choose an approach that best fits your needs.
Method 1: Discourage Search Engines From Indexing Your Site
This is the fastest setting to change, but it provides no access control.
- Go to Settings → Reading.
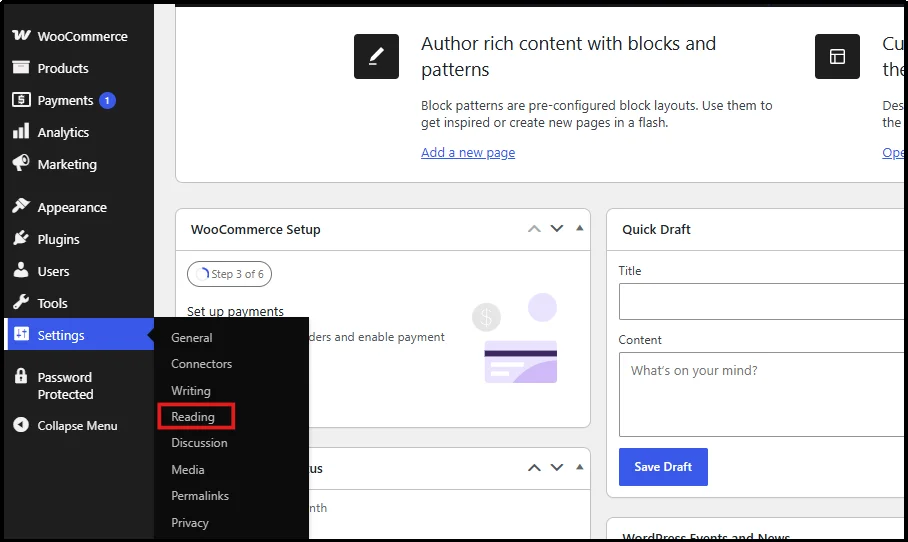
- Check “Discourage search engines from indexing this site.”
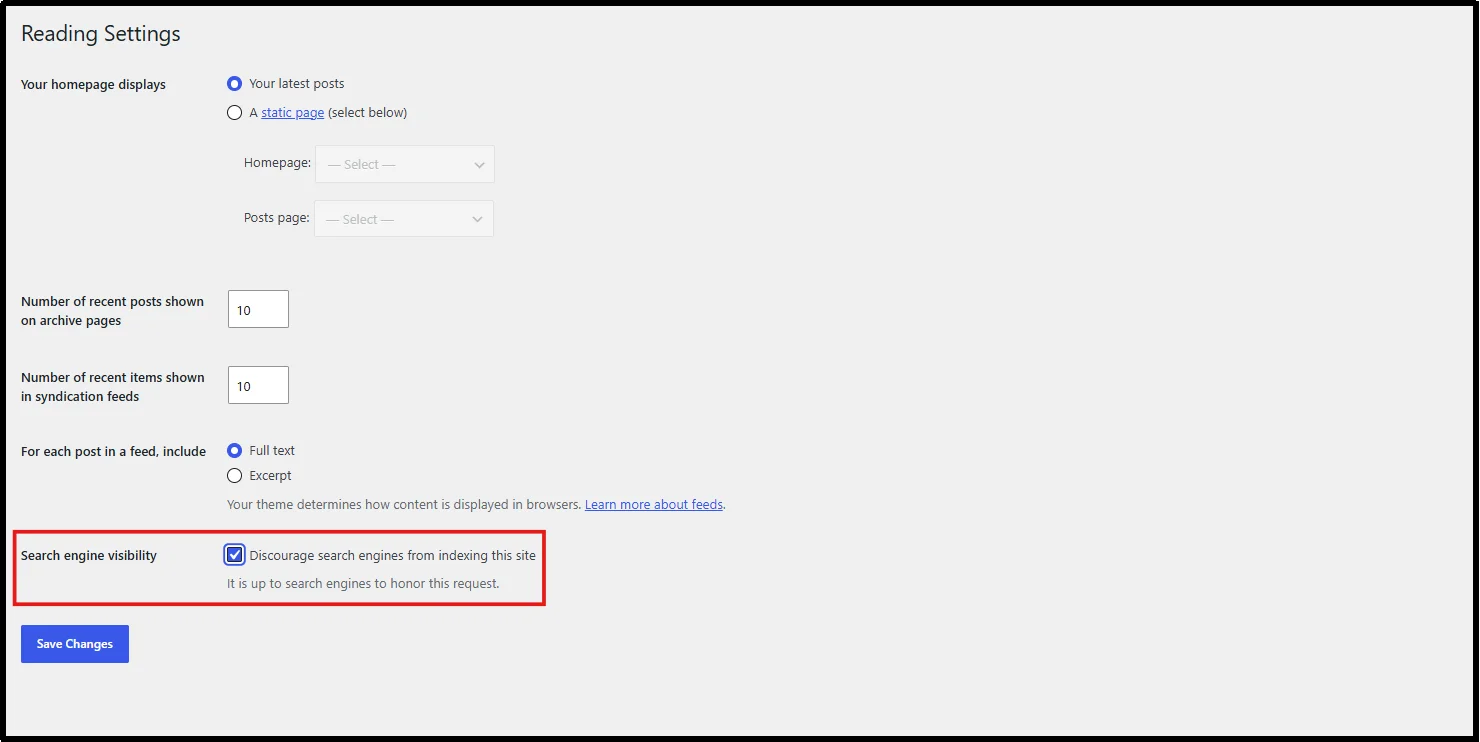
This tells search engines not to index your site in their search results. It does not block visitors or bots from accessing your pages. Major search engines generally respect the directive, but it does not provide an access-control mechanism. Anyone with a direct link can still access the site, and it does nothing to prevent referral traffic or bots from ignoring the request.
Use this setting to reduce search visibility during development, but do not rely on it to protect sensitive or private content.
Method 2: Show a Coming Soon or Maintenance Page with a Plugin
If you’re rebuilding a live site or launching something new, a coming soon or maintenance mode plugin can display a temporary landing page to visitors while authorized users continue working on the WordPress site.
Plugins such as Under Construction can simplify this process with templates and built-in maintenance or coming-soon settings.
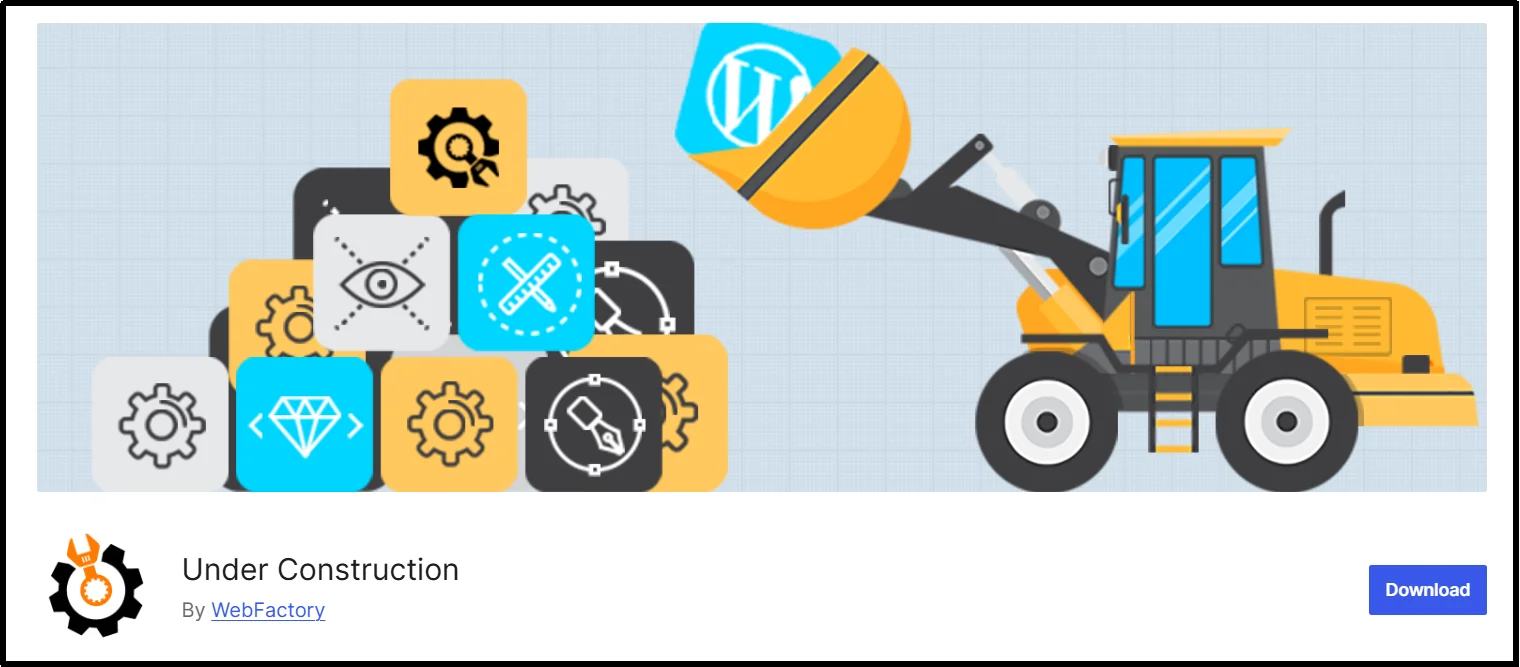
Some maintenance plugins let you create exceptions for specific IP addresses or authenticated users, allowing selected people to view the regular site while others see the holding page.
Two things to watch for: the plugin needs to stay active for the page to keep working, and if your site runs behind a CDN or cache, purge it after activating maintenance mode, or visitors may still see the old live version.
Method 3: Password Protect Entire WordPress Site
If you want to restrict access to the entire site without editing server files, a dedicated content protection plugin can provide site-wide password protection from the WordPress dashboard.
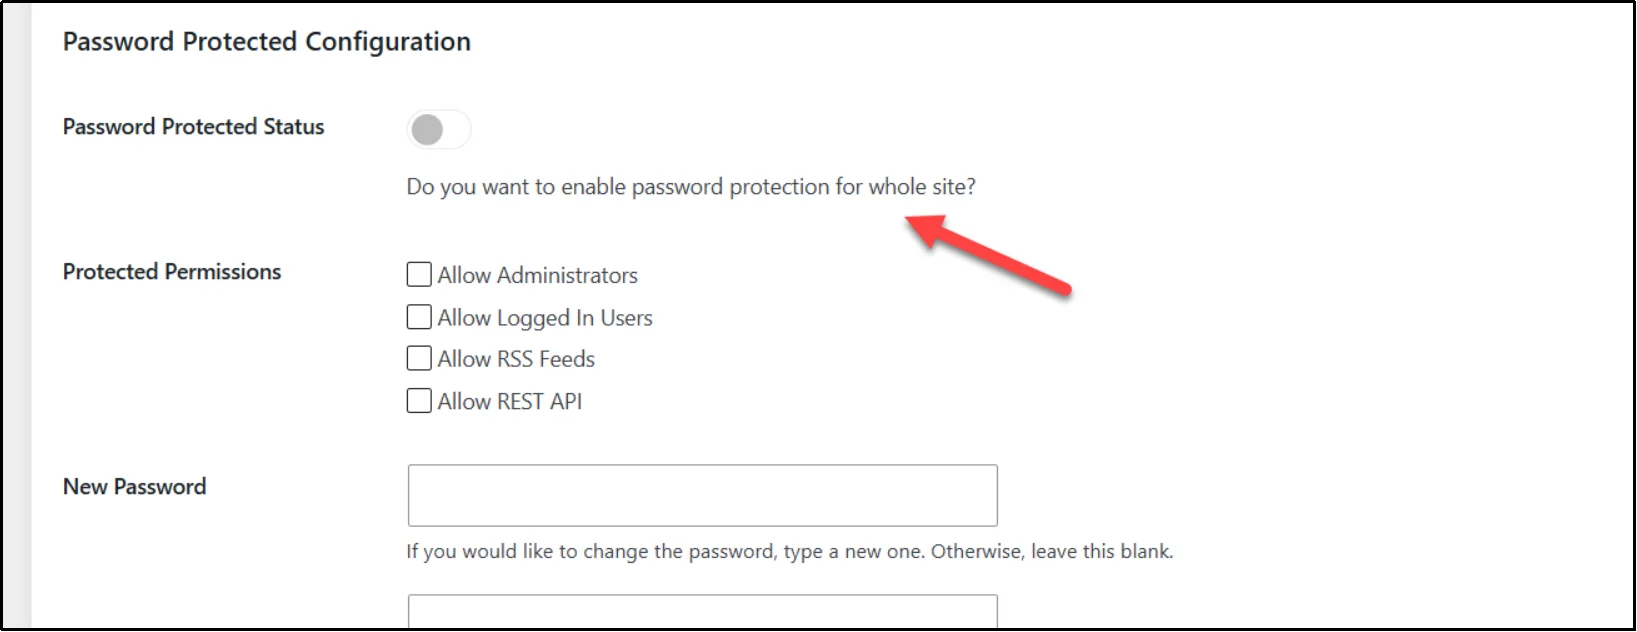
Password Protected lets you enable site-wide protection from a single settings screen, no matter how many pages or posts you have. Visitors who try to access protected content see a password prompt before they can view that content.
You can restrict your entire WordPress site with site-wide password protection. Check our guide on: How to Password Protect Your Entire Site.
Unlike WordPress’s built-in visibility settings, which you apply to individual posts and pages, site-wide password protection lets you restrict the entire site from a central setting.
Method 4: Password Protect Specific Pages, Posts, Custom Post Types, and Categories
If you want to hide only a part of your site, such as a members’ section, an internal resources category, or a set of unpublished product pages, granular protection is the better fit.
Password Protected handles this at several levels:
- Specific page or post protection, for locking individual pieces of content without touching the rest of the site.
- Custom post type protection, which covers content types like portfolios, courses, or WooCommerce products, not just default pages and posts.
- Category and taxonomy protection, which locks an entire group of content with a single action. When category protection applies to the category, new posts assigned to that category can inherit the same protection without requiring you to configure each post separately.
- Page exclusion, for keeping specific pages public even when broader protection is active elsewhere on the site, is useful for a login page or a public landing page that needs to stay reachable.
- Partial content protection, which lets you lock only selected sections of a page or post while leaving the rest publicly visible. This is useful for showing an introduction, preview, or teaser while keeping premium, sensitive, or unfinished content hidden behind a password.
This approach gives you more control when you want to protect specific sections of a site without restricting public access to everything else.
Method 5: Use WordPress’s Native Private and Password-Protected Visibility
WordPress includes two visibility settings for individual posts and pages, found under Status & Visibility in the editor:
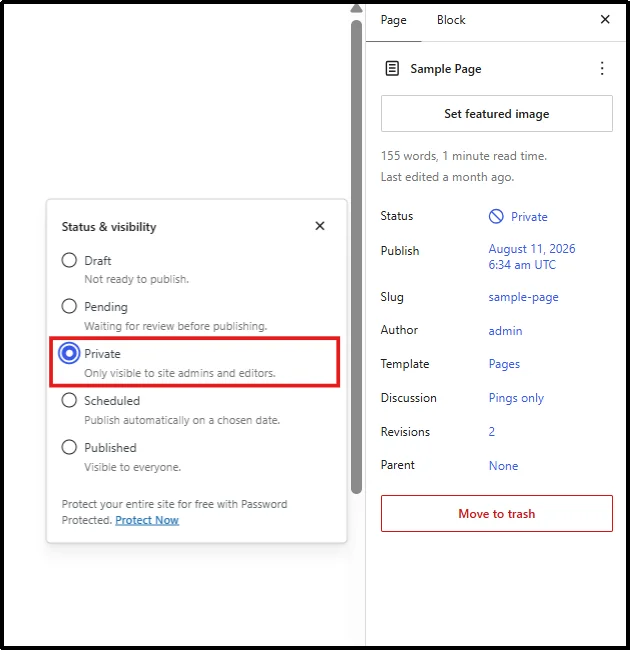
- Private: Only logged-in users with the required WordPress capabilities can view the content. By default, this generally includes administrators and editors. Visitors without the required permissions cannot view the private content and do not receive the standard password prompt.
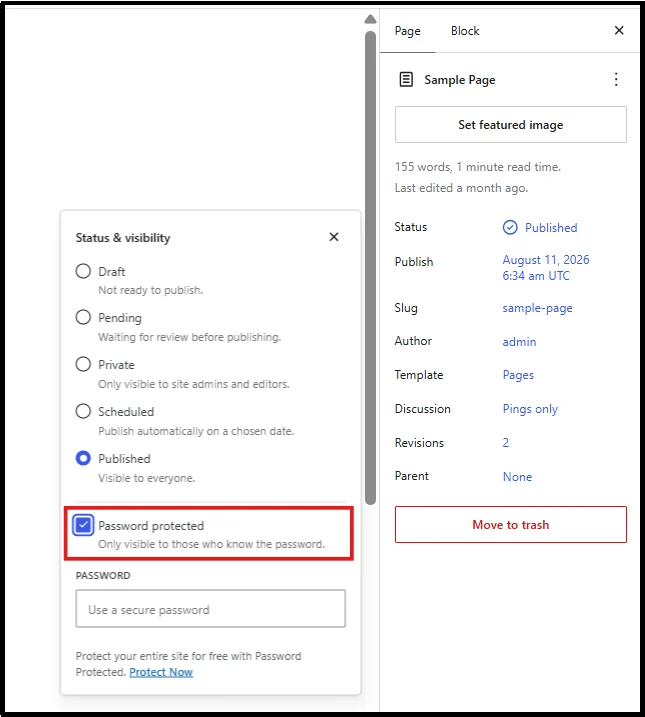
- Password Protected: The page remains publicly reachable, but visitors must enter the correct password before WordPress displays the protected content.
These settings work well for hiding a handful of pages while the rest of the site stays public. The limitation is scale: there’s no built-in way to apply this to your entire site at once. If you have dozens or hundreds of pages, setting visibility for each page individually isn’t practical.
Method 6: Block Everyone Except Your IP With the .htaccess File
(an image for .htaccess file)
The .htaccess file controls server-level rules for Apache-based hosting, including access restrictions. If your site runs on Apache 2.4 or later, you can use the following .htaccess rule to allow access only from a specific IP address:
<RequireAll>
Require all denied
Require ip 123.45.67.89
</RequireAll>
Replace the number with your actual public IP. To allow more than one address, list them on the same line:
Require ip 123.45.67.89 98.76.54.32
A few things to know before you touch this file:
- This blocks requests from IP addresses that do not match your allowlist, including requests from search engine crawlers. If you need search engines to access the site while restricting other visitors, an IP allowlist is not a suitable approach.
- If your internet provider assigns a dynamic IP, it can change without warning, and you can lock yourself out. Keep FTP or hosting panel access ready so you can revert the change.
- Back up the file before editing it, and confirm your server runs Apache before using this syntax; Nginx requires a different configuration entirely.
Method 7: Restrict Access Through Your Hosting Control Panel
Most hosts provide a panel like cPanel or Plesk with built-in access controls that don’t require editing code directly. Two options are common:
- IP Blocker, which denies traffic from addresses you specify.
- Directory Privacy, which adds HTTP authentication to a directory. You can use it to protect a staging directory or other server-level directory when your hosting environment supports it.
Password-protecting the document root can restrict access to the entire site, but caching layers and CDNs can affect how access-control changes appear to visitors. Purge relevant caches and test the site after applying the restriction.
If your host provides built-in staging or site-access protection, use those controls when appropriate because they can simplify access management without requiring manual server configuration.
As with IP-based .htaccess rules, double-check you’re not accidentally blocking legitimate traffic, such as payment gateway callbacks. Also check whether your restriction could block legitimate server-to-server requests, such as payment gateway webhooks or API callbacks.
Which Method Should You Use to Hide Your WordPress Site?
Not every method hides your WordPress site in the same way. Some prevent search engines from indexing your site, while others actually restrict visitors from accessing your content. Use the comparison below to find the right method based on your access, privacy, and technical requirements.
| Method | Protects access? | Hides from search engines? | Scope | Technical skill |
| Discourage search engines | ❌ No | Yes, as a directive | Entire site | Beginner |
| Password protection plugin | ✅ Yes | Usually | Entire site or selected content | Beginner |
| Content-specific protection | ✅ Yes | Usually | Pages, posts, categories, etc. | Beginner |
| .htaccess restriction | ✅ Yes | Yes, because access is restricted | Server/site | Advanced |
| Hosting controls | ✅ Yes | Yes, if inaccessible | Site/directory | Beginner–Intermediate |
| Private/password visibility | ✅ Yes | Protected content cannot normally be crawled | Individual content | Beginner |
| Maintenance/coming soon | Depends on configuration | Depends on SEO settings | Front end | Beginner |
What Happens to SEO When You Hide Your Site?
Password protection and Private visibility both block search engines from crawling content, just as a login-only membership area would. That’s expected and generally fine for content you don’t want indexed in the first place.
The Discourage search engines from indexing this site setting is different because it controls search-engine indexing rather than visitor access.
Search engines generally respect the noindex directive, but it does not prevent direct access to your URLs. Search engines may also discover URLs through external links even when they do not index the page content.
If you need to restrict public access rather than simply reduce search visibility, use password protection, authentication, or IP-based access controls.
Before launch, remove temporary access restrictions and review your site’s indexing settings. A forgotten noindex directive or access restriction can prevent search engines from crawling or indexing content you want to rank.
Choose the Method That Actually Fits
The best method depends on what you’re trying to achieve.
If you simply want to keep your site out of search results while it’s under development, the built-in Discourage search engines from indexing this site option may be enough.
If you need to temporarily replace your site with a holding page, a maintenance mode plugin is a better fit.
For developers who need strict server-level restrictions, .htaccess rules or hosting control panel tools offer more control.
If you want to restrict public access without editing server files, a dedicated content protection plugin can provide a simpler WordPress-based solution. It can password-protect the entire site or selected pages, posts, categories, custom post types, or specific content sections, depending on the plugin you choose.
Ready to make your WordPress site private? Get started with Password Protected and lock down your site in minutes.
Frequently Asked Questions
What’s the difference between Private and Password Protected visibility?
Private content is available only to logged-in users who have the required WordPress capabilities. By default, this generally includes administrators and editors. Password-protected content remains accessible to anyone, logged in or not, as long as they have the correct password. Private is for internal team access; Password Protected is for sharing controlled access with people outside your user list.
Will search engines index a site behind a coming soon or maintenance page?
A coming soon or maintenance page can prevent indexing when the plugin adds an appropriate noindex directive. Check the plugin’s SEO settings and verify the page’s robots directives before relying on it.
Can I give a client access to a hidden site without sharing a password?
Yes. If your protection plugin supports bypass links, you can give a client a unique URL that lets them access the protected site without entering the password.
Can I password protect just one category instead of the whole site?
Yes. A protection plugin that supports category and taxonomy rules can protect an entire content group instead of requiring you to protect each post individually. Depending on the plugin, new content assigned to the protected category can inherit the same restriction.
Does hiding my site stop Google from ever indexing it?
No. Temporary access restrictions can prevent search engines from accessing or indexing your content while they remain active. After you remove the restriction, make sure your indexing settings allow crawling and indexing. Search engines can then discover and index the site according to their normal crawling and indexing processes.