
Want to add Google reCAPTCHA to your WordPress password-protected form?
Protecting sensitive website content is essential, especially when certain pages or sections require restricted access.
Many site owners use password-protected pages to control who can view private information. While this is a solid first step, a password alone won’t stop automated bots from attempting to break in, especially through brute-force or credential-stuffing attacks.
As online threats evolve, attackers use increasingly advanced automation to gain access. Security experts recommend a layered protection approach, such as adding reCAPTCHA.
In this guide, we will show you how to add Google reCAPTCHA to your WordPress password-protected form easily. Before we begin, here’s a quick overview of how reCAPTCHA works and why it matters.
Let’s get started!
What is Google reCAPTCHA?
Google reCAPTCHA is a security system designed to detect whether an interaction comes from a human or an automated bot. It stands for the Completely Automated Public Turing test to tell Computers and Humans Apart. The goal is simple: allow humans to pass through easily while blocking automated software.
It uses advanced risk analysis techniques to achieve this, and older versions required users to solve challenges like identifying distorted text or images.
Newer versions, such as reCAPTCHA v3, run silently in the background and assign each request a “risk score,” helping websites decide how to handle suspicious behavior. Lower scores mean the user might be a bot. This system often doesn’t even require users to click an “I’m not a robot” box.
The technology protects millions of websites and sees billions of interactions every day. It’s one of the most widely trusted anti-spam and bot-detection tools used across millions of websites. This massive scale helps the system learn and adapt to new bot patterns constantly, offering reliable protection.
Why Add Google reCAPTCHA to WordPress Password Protected Form?
Even with a strong password, bots can still attempt to crack it. Studies show that nearly 80% of cyberattacks involve stolen or automated password-guessing attempts.
Here are the main reasons why reCAPTCHA is essential for password-protected WordPress pages:
- Mitigate Brute-Force Attacks: While a password protects against unauthorized access, bots can still attempt numerous password combinations in a short period (brute-force attacks). reCAPTCHA acts as a barrier, preventing these automated attempts by requiring human verification before a password can even be submitted.
- Prevent Automated Abuse: Beyond brute-forcing, bots can be used for various forms of abuse, such as spamming the form with invalid entries or exploiting vulnerabilities. reCAPTCHA helps ensure that only legitimate human users are interacting with the form.
- Enhance Overall Security: By filtering out automated requests, reCAPTCHA reduces server load, blocks malicious traffic, and adds a reliable second layer of protection to your private pages.
- Protect Against Credential Stuffing: If the password for your protected form is compromised elsewhere (e.g., through a data breach on another site), reCAPTCHA can help prevent automated attempts to use those compromised credentials on your site.
In essence, reCAPTCHA acts as a pre-filter, ensuring that any attempts to access your password-protected content are made by a human, significantly reducing the effectiveness of automated attacks and strengthening the security of your protected areas.
How to Add reCAPTCHA to WordPress Password Protected Form?
WordPress includes a basic built-in password protection feature, but it doesn’t offer native support for Google reCAPTCHA. Many third-party plugins also lack this integration, leaving protected pages vulnerable to automated attacks.
To properly secure your private content and block advanced bot attacks, you need a solution designed with modern, automation-resistant security features. The Password Protected plugin offers this convenient feature, allowing you to instantly activate reCAPTCHA protection on your protected content screens.
This makes it one of the best options for anyone serious about protecting private or restricted WordPress content.
The plugin provides a robust set of features beyond simple protection, giving you complete control over your site’s access. The ease of use, combined with top-tier security tools, makes it the best solution available.
Here are a few key features that you can get along with reCAPTCHA:
- Complete Site Protection: Lock your entire WordPress site with a single master password, which is ideal for staging sites, client projects, or in-development builds.
- IP Address Whitelisting: Allow specific IP addresses to bypass the password screen entirely. This is a crucial security feature for trusted team members or internal networks.
- Multiple Password Management: Easily create and manage several unique passwords to grant access to different users or groups. You can quickly enable or disable individual passwords as needed.
- Brute-Force Protection: Automatically limits repeated failed attempts, blocking bots that try to guess your passwords through rapid automated submissions.
- Passwordless Admin Access: As an administrator, you can choose to skip the password prompt. This simplifies your login process without compromising the protection for general visitors.
And much more! Check out all the features on our dedicated features page.
Add Google reCAPTCHA to WordPress Password Protected Form: 3 Steps
Now that you’ve seen how powerful the Password Protected plugin is, let’s walk through the simple steps to install it and enable Google reCAPTCHA on your password-protected pages.
Step 1: Install Password Protected
Begin by installing the Password Protected plugin on your WordPress site. It’s a simple step that makes your site more secure and gives you peace of mind.
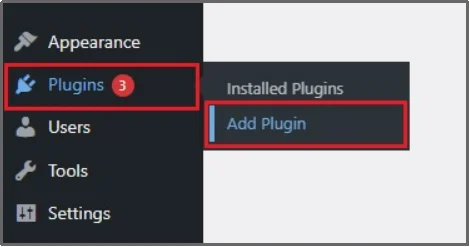
- Go to the WordPress admin dashboard.
- Hover over the Plugins and then click Add Plugin from the extended menu.
- Search for “Password Protected.”
- Look for the plugin by Saad Iqbal. Click Install Now.
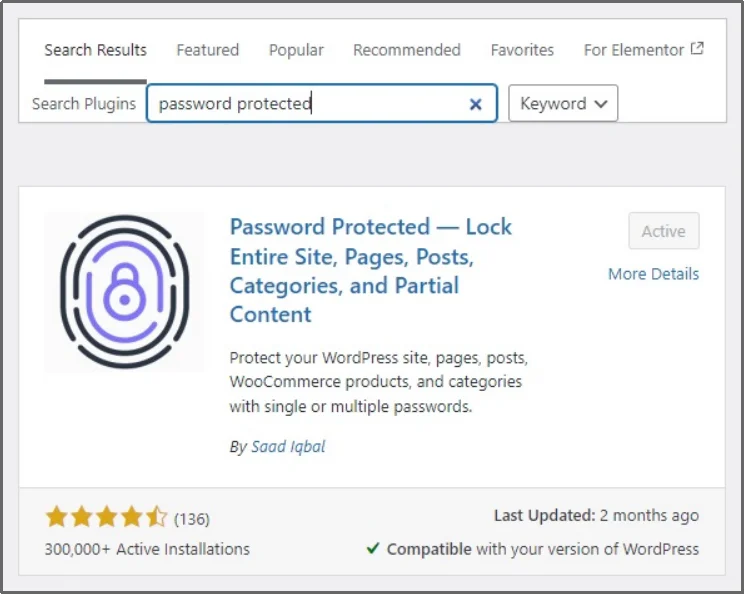
- Afterward, click Activate.
The free version provides excellent basic protection, but if you’re looking for more advanced options, the premium version is the way to go. It offers the aforementioned features and many others, such as multiple passwords, bypass links, password logs, expiration rules, and more.
If you want to go with the premium version, go to Password Protected’s pricing page and purchase a plan of your choice.
Step 2: Configure reCAPTCHA
Next, you need to get your unique keys from Google and configure the settings within the Password Protected plugin.
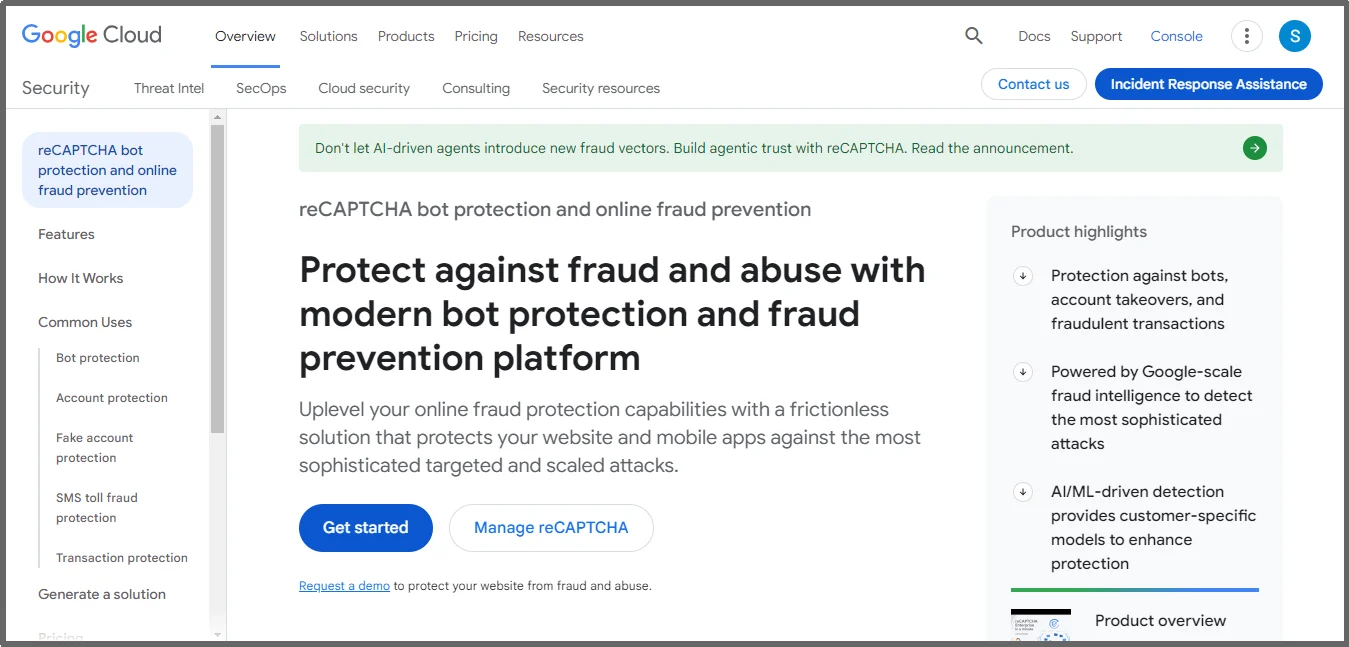
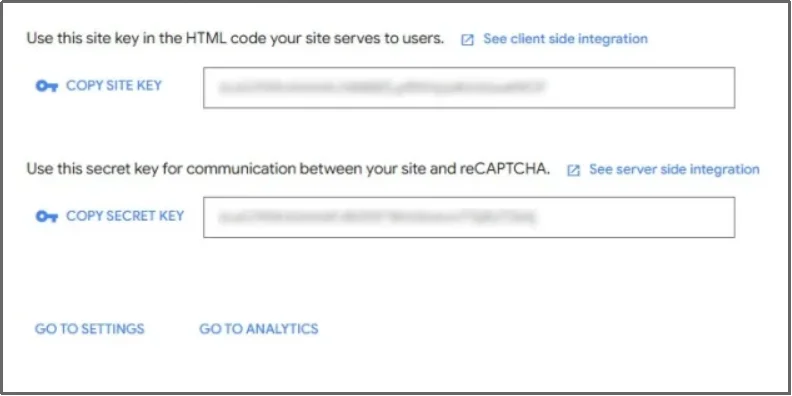
First, register your website with Google reCAPTCHA to get the necessary access codes.
- Go to the Google reCAPTCHA page in Google Cloud and register a new site using the Get Started button.
- Configure the settings, including the reCAPTCHA version, placement on the site.
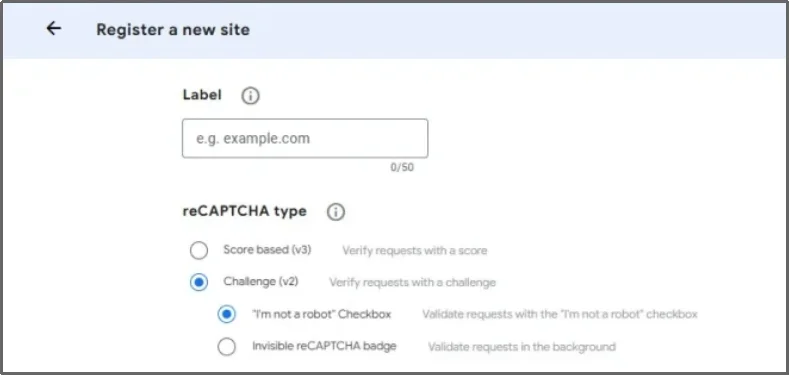
- Google will provide you with two unique codes: a Site Key and a Secret Key. You will need both of these codes for integration.
- Log in to your WordPress dashboard and navigate to Password Protected.
- Switch to the Security tab and the Captcha subtab.
- Select reCAPTCHA.
Note: Password Protected also offers anti-bot technologies. Learn more about Turnstile and hCaptcha. Also check out the reCAPTCHA vs. hCaptcha comparison or reliable reCAPTCHA alternatives.

- Paste your Site Key and Secret Key into the provided fields. If you choose reCAPTCHA v3, select your preferred minimum score. A score closer to 1.0 indicates a human-like interaction, while a score closer to 0.0 signals bot-like behavior.
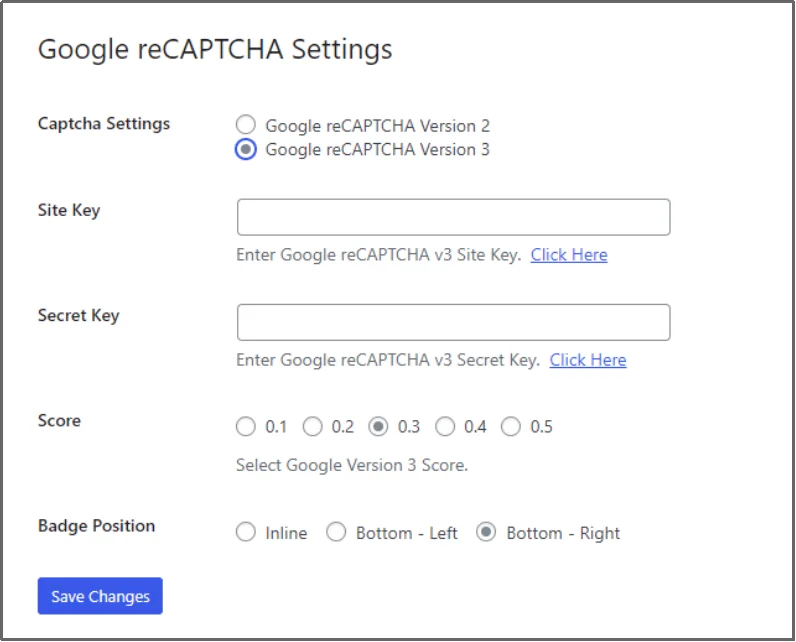
- Save your changes, and there you go!
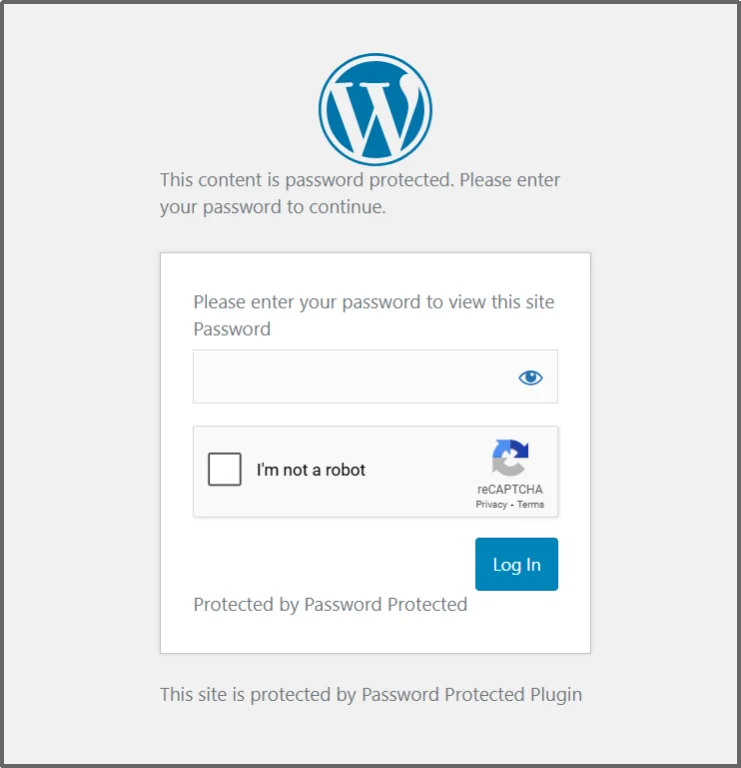
Now your password-protected screen has reCAPTCHA.
For detailed instructions, check out our documentation.
Step 3: Test reCAPTCHA
After setting up the keys, always check that the features work as they should. Hence:
- Log out of your WordPress site.
- Visit any protected page on your website.
- You should now see the reCAPTCHA element (I’m not a robot box for v2 and a small badge for v3) appear on the password form.
- Enter the password to confirm you can still log in.
Common reCAPTCHA Problems You May Face
Sometimes, the integration might not work perfectly right away. Here are a few common issues and their simple fixes:
reCAPTCHA Not Showing
If the checkbox or badge doesn’t appear, you’ve likely entered an incorrect Site Key or Secret Key. Even a single incorrect character can break the integration.
Failed Verification Error
This typically happens when the keys don’t match the selected version (v2 or v3) or when the Site Key and Secret Key are mixed up. Double-check both.
Invalid Domain Error
This occurs when your domain isn’t correctly added in your reCAPTCHA settings. Revisit the Google reCAPTCHA console and ensure your domain is listed exactly as it appears on your website.
Also, you might want to read this 👉 Eight best WordPress password protection practices.
Lock Down Your Content with Pro-Level Security
You now know how important Google reCAPTCHA is for protecting your private WordPress content from automated threats such as brute-force and credential-stuffing attacks.
Integrating this human verification step with your password protection creates a powerful double-layered defense. The Password Protected plugin offers this easy integration, a feature often missing in basic WordPress protection methods.
Ready to secure your protected pages with pro-level defenses? Upgrade to Password Protected Pro today and block automated attacks before they even reach your password form.