Do you want to password protect only a specific section of an Elementor page instead of hiding the full page? Many creators need a way to gate exclusive content, downloads, or private blocks without blocking access to the entire layout.
Elementor offers excellent design flexibility, but it does not include a built-in option to password protect a single section, column, or container. This limitation forces users to look for a plugin-based solution.
The good news is that by using a specialized solution, you can quickly add a password to a specific section of your page. This article can show you how.
Let’s dive in.
What is Page and Post Content Sections Protection?
Page and post content sections protection (also known as partial content protection) lets you lock only a selected area of your page, such as a widget, column, container, or full section, while keeping the rest of the content fully visible.
This works differently from full-page password protection. With full-page protection, visitors cannot view anything until they enter the password. Section protection hides only a chosen block, giving you finer access control.
For example, on a WooCommerce product page, you may show product details publicly but lock the download link, discount code, or bonus resources behind a password. This targeted gating adds exclusivity without hurting conversions.
Why Password Protect Content Sections in Elementor?
Password protecting only a section in Elementor gives you advanced control over what visitors can access. Here are the main reasons why you might want to password protect specific content blocks:
- Offer Exclusive Content: You can provide special information, advanced tips, or premium guides only to paying subscribers or members. This adds value to their membership.
Also Read: Password Protection vs Membership Plugins: Which Is Better for WordPress Post Visibility?
- Run Private Promotions: Lock down coupon codes, special discounts, or early-bird offers just for a select group of customers. This makes the promotion feel more exclusive.
- Share Sensitive Information: Quickly hide internal documents, reports, or files that should only be seen by a specific team or partner. It keeps private data secure without hiding the public-facing page.
- Test New Products/Features: Grant early access to beta testers to a specific content area on a product page. This allows you to gather feedback before a full public launch.
- Create Gated Resources: Secure special downloads, checklists, or videos that users must sign up for to receive the password. This is a great way to grow your email list.
How to Password Protect Page/Post Sections in Elementor?
Elementor is an excellent and widely used page builder for WordPress. It gives you incredible control to design your pages and posts exactly how you want them. The builder is packed with features for layout, styling, and adding cool elements to your site.
However, Elementor does not come with a simple, built-in feature to protect only a section of your content by default. Its main features are focused on design, not deep access control. If you only want to hide a single row or container, you will quickly find that the core Elementor toolset is limited for this purpose.
For this specific task of protecting just partial content, you need a dedicated plugin. A specialized content protection plugin will provide the necessary tools to apply a password field to any content section you choose.
That is why we will be using the Password Protected WordPress plugin. This plugin is the best choice for protecting full pages, posts, or, in our case, small sections of content in Elementor. It gives you an easy way to lock down your exclusive content without writing any custom code.
Why Choose Password Protected?
The Password Protected plugin stands out because it goes far beyond simply hiding a whole page. It is a complete security tool that gives you exact control over your content. It offers a solution for nearly every security need you might have on your WordPress site.
Here is a list of its key features and what it offers:
- Partial Content Protection: This is the feature we are focusing on! It lets you lock specific sections or blocks of content within any page or post. This works perfectly with Elementor and other popular page builders.
- Full Site Protection: You can easily put your entire WordPress website behind a single master password. This is ideal for sites that are under construction or being developed privately.
- Specific Page/Post Protection: You can password-protect individual pages, posts, or even custom post types, such as WooCommerce products or portfolio items.
- Multiple Password Management: The plugin allows you to create and manage unlimited passwords. This means you can give unique access to different users or client groups.
- Category and Taxonomy Protection: You can lock down entire categories of blog posts or other groups of content with one password, securing many articles at once.
- Role-Based Access: You can whitelist (allow) certain WordPress user roles, like Administrators or Editors, to bypass the password screen completely after logging into the website.
- IP Address Whitelisting: You can add specific IP addresses to a list, so users accessing your site from trusted locations (like your office) never have to enter a password.
- Limit Login Attempts: This feature protects your password screens from brute-force attacks (where hackers repeatedly try different password combinations) by limiting how many incorrect attempts are allowed.
- Password Expiration & Usage Limits: For temporary access, you can set passwords to expire after a certain date or limit how many times a password can be used.
The Password Protected plugin offers all these powerful features in a simple, easy-to-use package, making it the best choice for protecting your content.
Password Protecting Page/Post Sections in Elementor: 3 Easy Steps
Now that you understand the powerful benefits of the Password Protected plugin, let’s jump into the first step: getting the plugin set up on your WordPress site.
You should know that the highly requested feature of protecting just a section of content is part of the premium version of the plugin. By choosing the premium option, you unlock all the advanced features we listed earlier. This includes multiple passwords, user role whitelisting, and much more, giving you the best content security solution.
Having said that, let’s jump right back into the process:
Step 1: Install and Activate the Plugin
Installing a plugin from the WordPress repository is very simple and only takes a moment.
- Start by logging into your WordPress website’s administrative area.
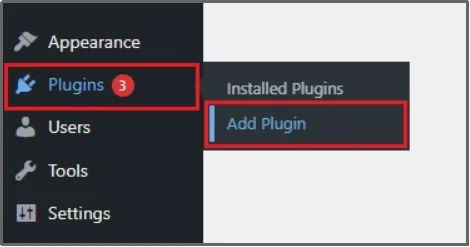
- On the left-hand menu, hover over Plugins and then click on Add Plugin.
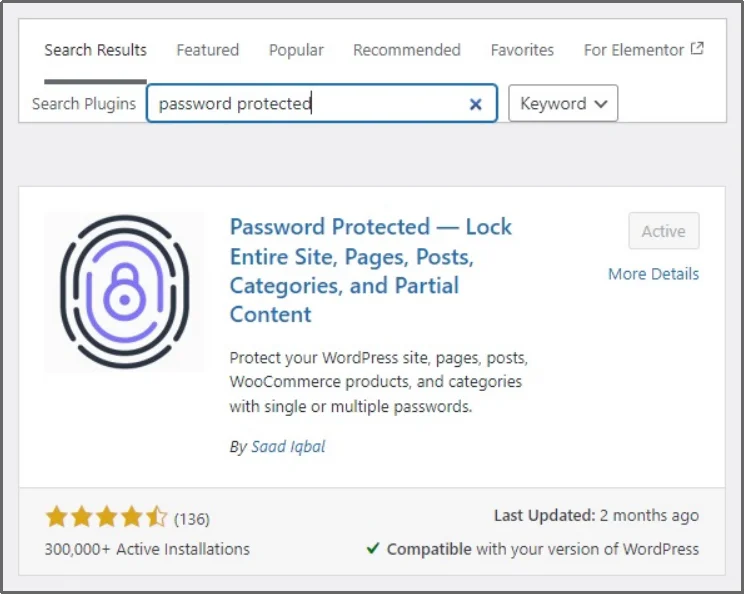
- In the search bar on the right side of the screen, type “Password Protected”.
- The plugin should appear as the first result. Click the Install Now button next to the plugin name.
- Once the installation is finished, the Install Now button will change to an Activate button. Click Activate to turn the plugin on and make it ready to use.
The Password Protected plugin is now active on your website. However, as we learned earlier, this is a premium-exclusive feature; hence, we need to get the premium as well. Follow the steps below to complete the installation.
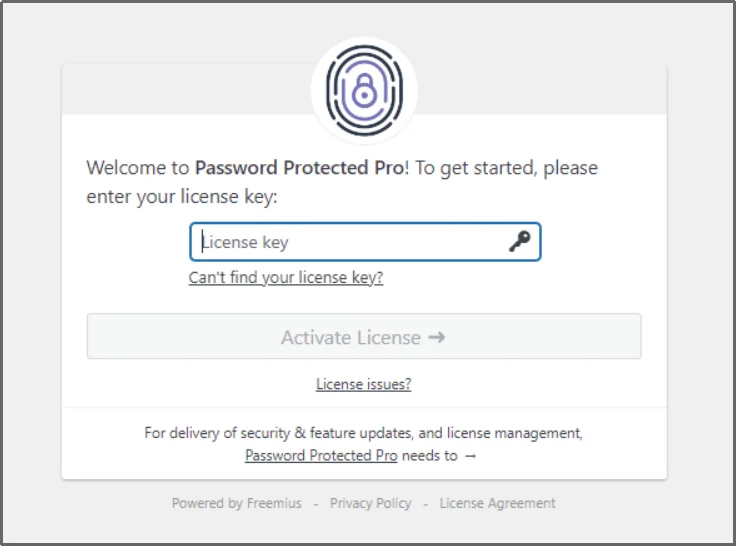
- Go to the Password Protected pricing page and purchase a plan.
- You will receive a ZIP file along with a string of random characters, known as the license key. Download the ZIP file to your computer, then copy the license key to your clipboard.
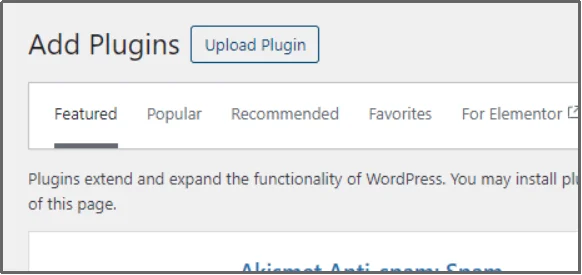
- Return to the Plugins tab, and click Add Plugin. Finally, click Upload Plugin in the top-left corner.
- Click Choose File, then browse to where you saved the ZIP file.
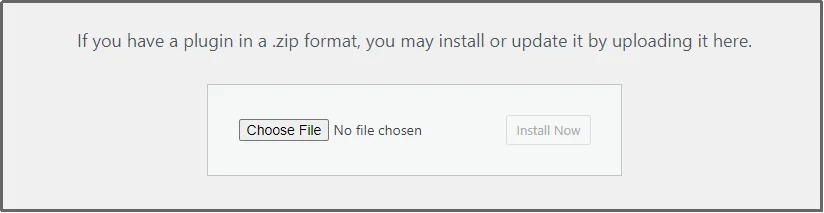
- Click Install Now.
- Wait for the installation to complete, then click Activate Plugin.

- Finally, enter your license key to unlock all the amazing features, including Partial Content Protection.
Step 2: Partially Protect Post/Pages on Elementor
Now that the Password Protected plugin is active, you are ready to use it inside the Elementor editor. This is where you will choose exactly which content blocks to hide.
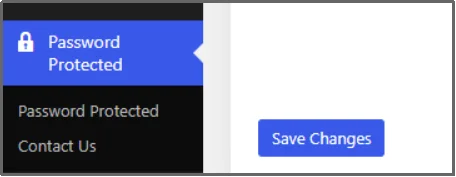
First, navigate to the Password Protected settings.
Go to the Content Protection tab, then Partial Content Protection, and enable the feature using the toggle button.
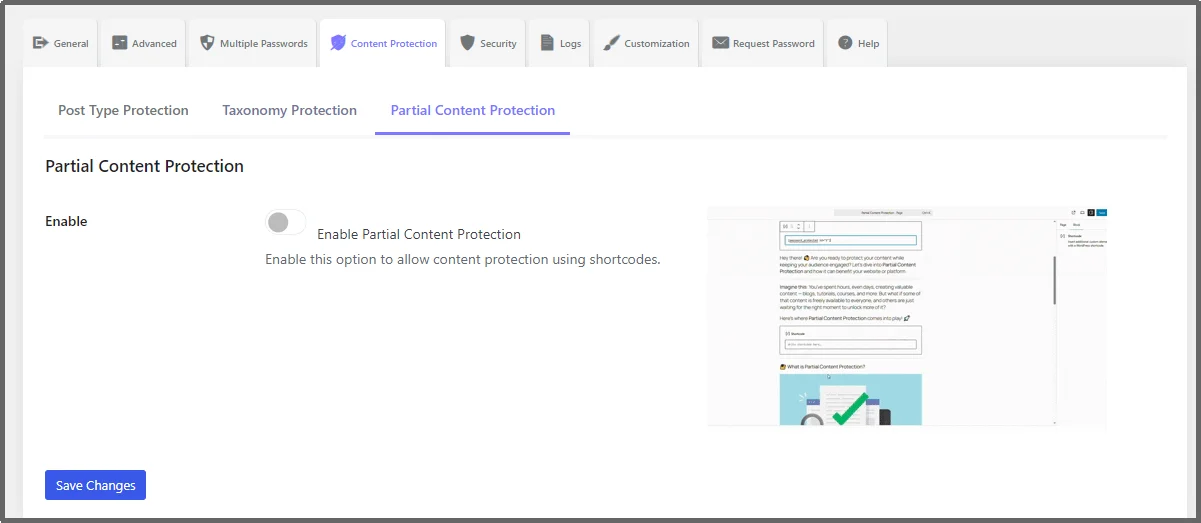
Once done, you have successfully enabled the feature.
Now, jump to the Manage Password section. Click Add New Password to create a new password entry.
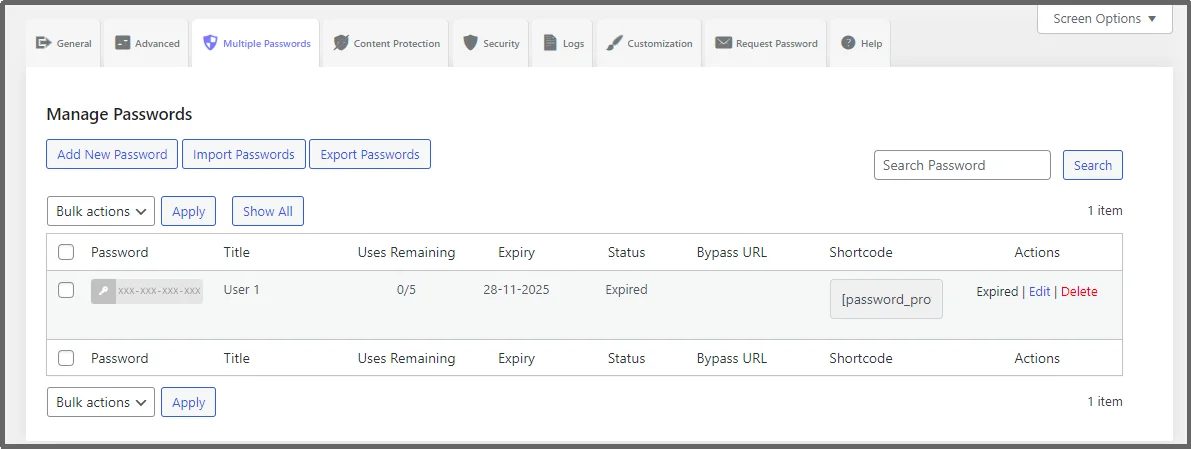
Fill out the necessary details. Remember that bypass links do not work on partial content protection.
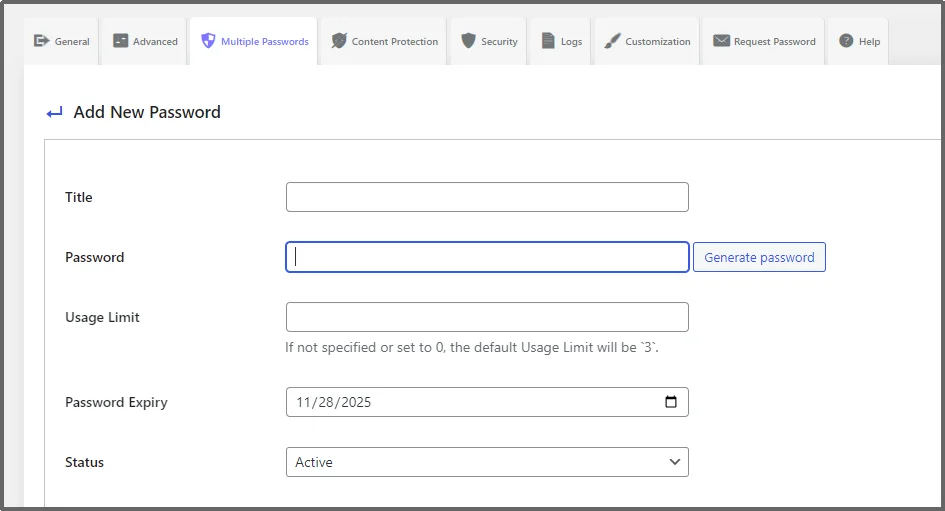
Pro Tip: Weak passwords are a cause of cyberattacks 50% of the time. Hackers use brute-force or credential-stuffing attacks to crack passwords. Use the Generate password button to automatically generate a strong password.
Now go back to the Post/Page, edit or create a new one.
Here you can see that we have a new post.
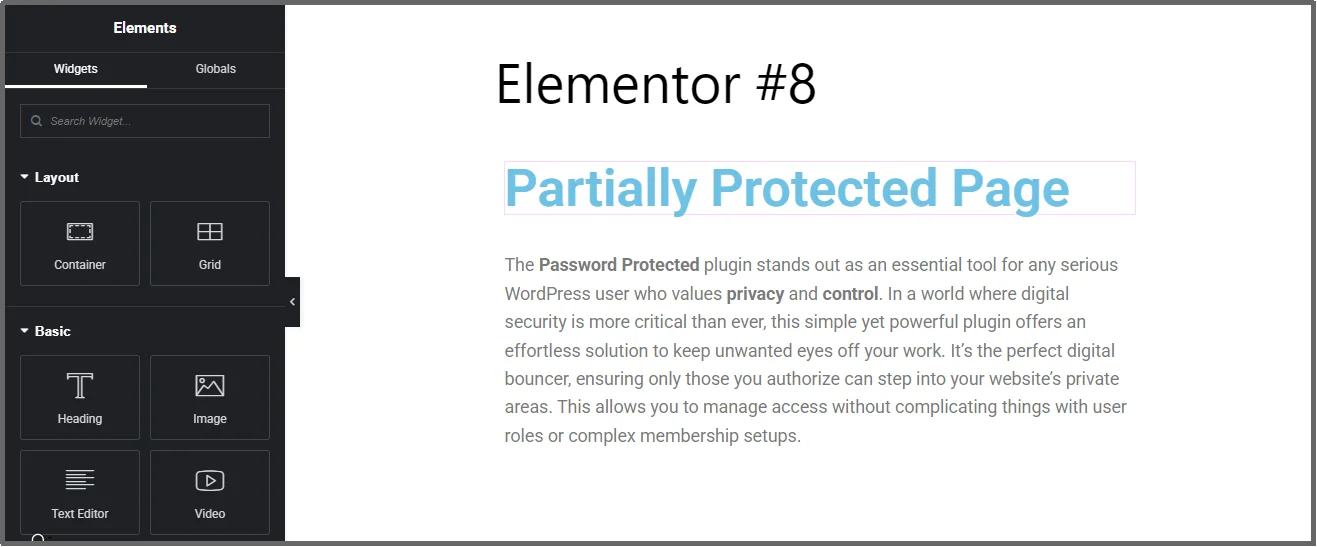
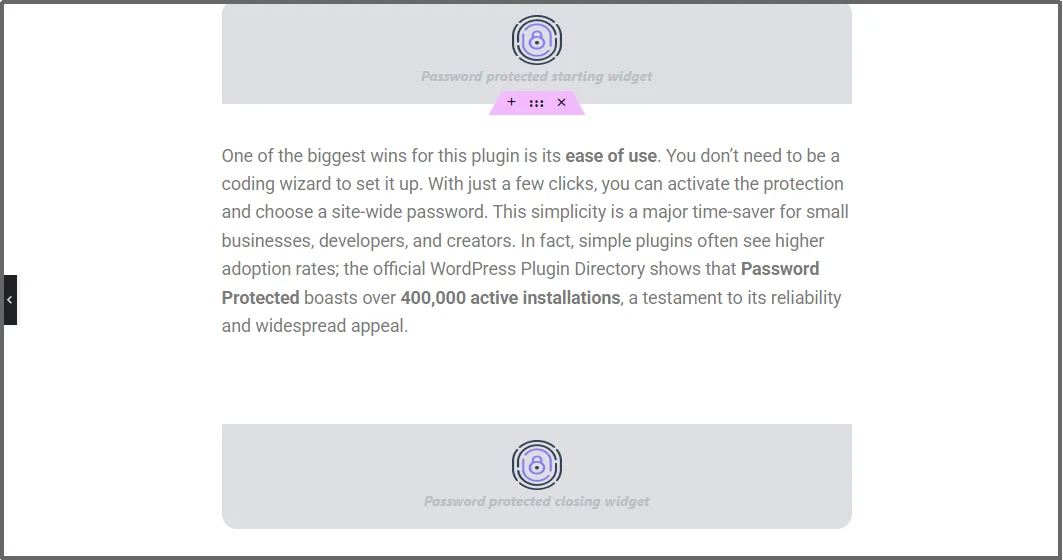
Go to the section that you want to protect, and add a “Password Protected Starting Widget” at the beginning of the section that you want to protect.
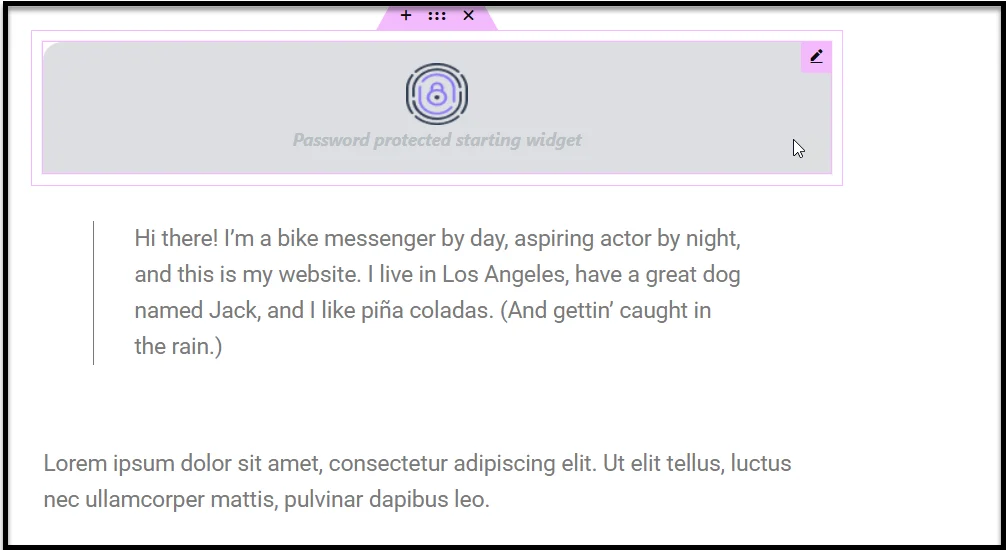
And close it with the Password Protected Closing Widget.
Now, click on the starting widget to reveal additional options on the left-hand side. Select a Password from the drop-down.
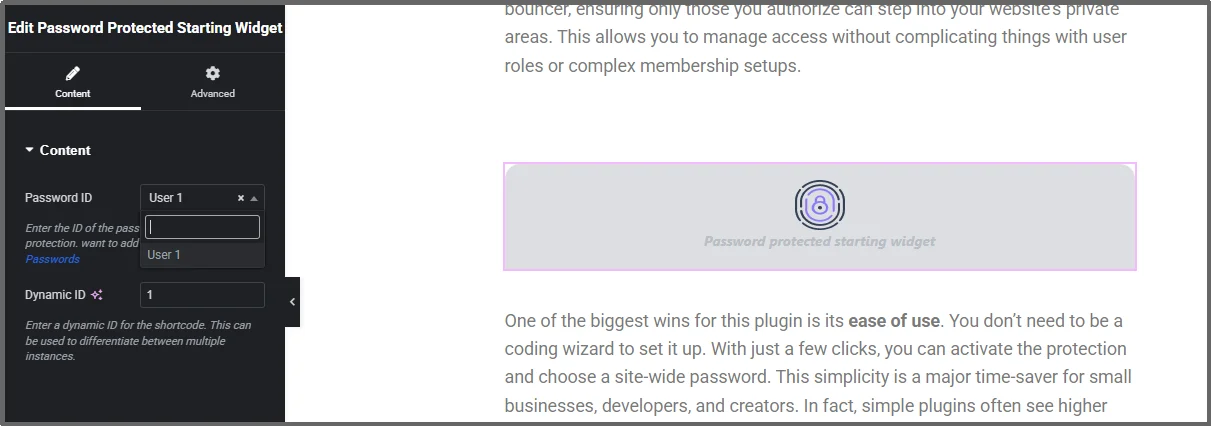
Enter a Dynamic ID. It allows you to unlock multiple partially protected sections in one go.
Let’s understand this with an example. Imagine you have three protected sections:
- Sections A and B share Dynamic ID: 1
- Section C uses Dynamic ID: 2
When a visitor unlocks Dynamic ID 1, both A and B open together, while C remains locked.
Alternatively, you can set the same Dynamic ID for all three sections. When a user enters the single password, all protected areas on that page will unlock at once.
Finally, post the Post/Page using the Publish button at the top right corner.
Step 3: Test the Partially Protected Content Section
After applying protection, preview the page in an incognito window. The protected section should display a password box. Enter the password to ensure it reveals the hidden content correctly.
First, make sure you save all changes to your Elementor page. Next, open the page in a new incognito window (a private browser session) or log out of your WordPress account completely. This lets you view the page as a regular visitor would.
When you load the page, the protected content section should now be hidden, showing only the password entry field. Enter the password you set for that section. If successful, the exclusive content will appear instantly on the page!
It is smart to test every change you make to your password protection settings. Even though Password Protected and Elementor work great together, testing helps you identify potential issues quickly. It is always better for you to find and fix any problems before your users do.
Unlock True Content Control with Password Protected Pro
This flexibility means you have complete control over your content strategy. Whether you are running a single VIP giveaway or managing a page with multiple membership tiers, the Password Protected plugin handles it easily. This powerful feature ensures that your exclusive content is secure, professional, and accessible only to the right audience.
This powerful functionality ensures that your premium content is not only secure but also delivered in a professional way that matches the advanced look of your Elementor designs. It is the ultimate tool for controlling who sees what on your WordPress site without locking down everything. Ready to secure your Elementor sections and offer exclusive content? Get Password Protected Pro and unlock advanced partial-content protection today.