

Hackers already know where to find your WordPress admin area. Since wp-admin and wp-login.php are the same on every WordPress site, the login page is one of the most predictable targets on the internet. Before you finish reading this sentence, automated bots will have already scanned thousands of websites for WordPress login pages.
That predictability is exactly why WordPress sites are hit so often, and so consistently. Though WordPress powers over 42% of all websites globally, the same scale makes it one of the most heavily probed platforms on the internet. Most of that traffic is automated bots working through lists of common usernames and leaked credentials around the clock.
Fortunately, you don’t need enterprise-level security tools to significantly improve WordPress login security. This guide walks through the top ten practical ways to protect your WordPress admin area.
Quick Answer:
To achieve maximum WordPress login security, combine strong, unique passwords, two-factor authentication (2FA), login attempt limits, SSL/HTTPS enforcement, a web application firewall (WAF), and directory-level password protection on your wp-admin folder.
Common Threats Targeting the WordPress Login Page
Your WordPress login page sits at a predictable URL on every default installation, making it an easy target for malicious bots. Once automated scripts locate your login page, they launch round-the-clock brute-force attacks. These malicious scripts rapidly test thousands of username and password combinations until they crack your valid credentials.
Consider these critical industry statistics:
- WordPress sites collectively face roughly 90,000 login attacks every 60 seconds, according to industry monitoring data.
- Hackers disproportionately target small businesses in cyberattacks, largely because they assume smaller sites possess weaker defenses than enterprise networks.
- Many internet users still reuse passwords or underestimate their strength, which is exactly what automated brute-force tools are built to exploit.
Think of your admin area as the master key to your website. If a malicious actor breaches this area, they can inject malware, steal customer data, redirect your traffic, or delete your site entirely. The highest-leverage security decision you can make today is to actively protect the WordPress admin area.
10 Ways to Protect Your WordPress Admin Area
Some methods on this list may seem simple, but each adds an important layer of protection. Together, they significantly reduce the risk of unauthorized login attempts – especially if you’re a beginner working to protect the WordPress admin area for the first time.
Method 1: Use Strong, Unique Admin Credentials
Hackers frequently exploit weak passwords, reused credentials, and credential-stuffing attacks to gain unauthorized administrator access.
- Never use “admin” as your administrator username. If you used it during your initial WordPress installation, create a new administrator account with a unique username and delete the old one.
- Create a robust password: use at least 12 characters, mixing uppercase, lowercase, numbers, and symbols. If you can easily recite it from memory, it lacks sufficient complexity.
- Use a dedicated password manager instead of trying to memorize complex strings yourself.
- Leverage the built-in WordPress password generator. When you edit a user’s profile, click “Generate Password” instead of typing your own.
- Enforce a strict password policy using a security plugin if you run a site with multiple authors or editors. This ensures every account meets a minimum security standard, not just yours.
During comprehensive WordPress security audits, weak or reused administrator credentials consistently remain the leading cause of unauthorized access. Fix this vulnerability first.
Method 2: Password Protect Your WP-admin Directory
Password protection is arguably the single most effective layer you can add for wp-admin security.
The problem: By default, anyone who types yoursite.com/wp-admin/ reaches your login page.
The traditional fix: Set up directory-level password protection through cPanel, or by editing an .htaccess file (too risky – we recommend you don’t edit the htaccess file). It works, but it’s slow and only available if your host gives you that kind of file access.
The better way: the Password Protected plugin creates an additional authentication layer before WordPress even loads the WordPress login page.
How it works:
- Log in to your WordPress dashboard
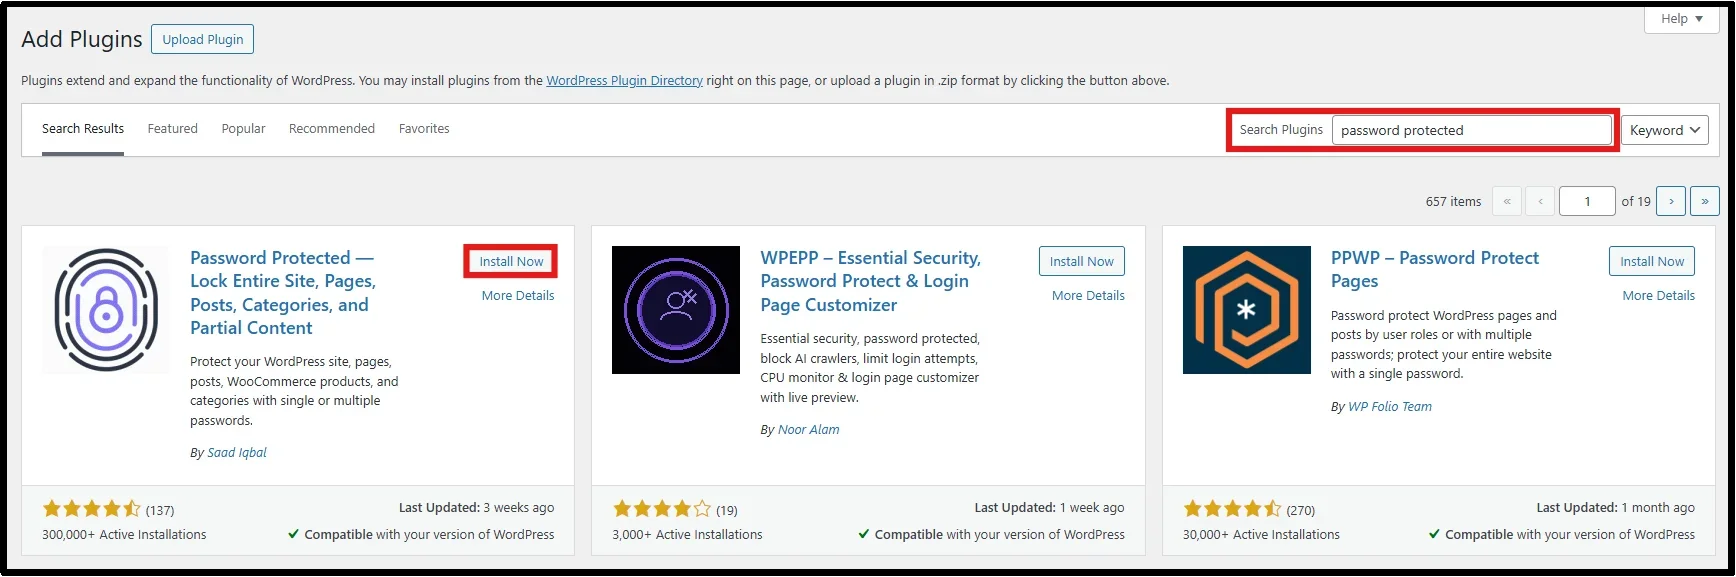
- Navigate to Plugins → Add Plugin
- Search for Password Protected
- Find the plugin developed by Saad Iqbal and click Install Now
- After that, click Activate.
NOTE: The WP-Admin Protection feature is in the premium version of the Password Protected plugin.
- Purchase any premium plan for the Password Protected plugin, then install and activate it from your WordPress dashboard. For the step-by-step process, check out our documentation.
- From the sidebar, go to Password Protected → Security → WP-Admin Protection, toggle on Enable Admin Protection, and set your password.
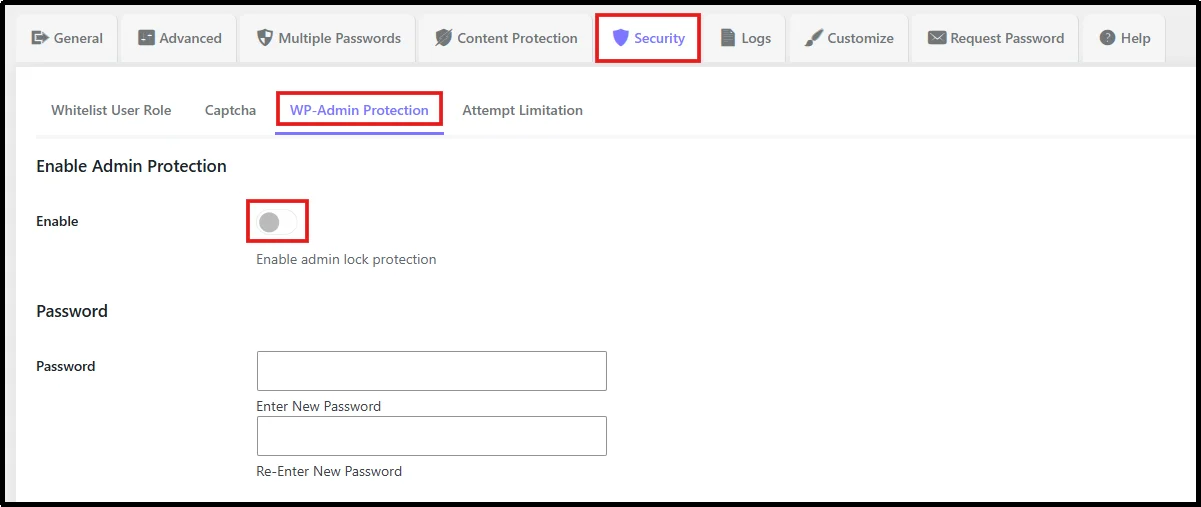
- Save your changes. Your wp-admin area now requires a password before anyone can access the login page – here’s what that looks like.
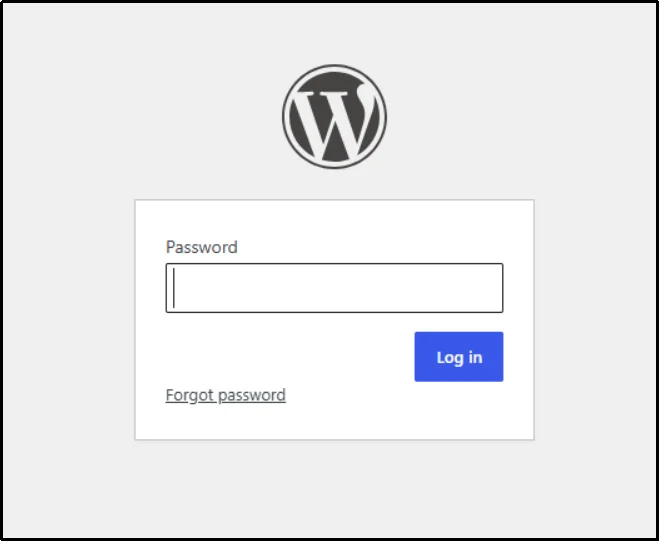
Anyone who reaches wp-admin without the password hits a wall immediately. It works on any hosting setup because it’s handled at the WordPress level rather than the server level, which makes it a straightforward option for protecting your login page.
Why this beats the cPanel approach:
| Method | Difficulty | Time | Hosting Required |
| cPanel Directory Privacy | Medium | ~10 min | Requires cPanel access |
| Manual .htaccess edit | Hard | ~15 min | Requires FTP/file access |
| Password Protected plugin | Easy | ~2 min | None |
This single change adds a full authentication layer that most attackers never get past, because their scripts are built to find a login form.
Method 3: Change Your WordPress Login URL
The default login URL (/wp-login.php or /wp-admin/) is common knowledge. It’s identical across millions of sites, which is exactly why it’s the first thing bots target.
- Use a plugin like All in One Login (it is FREE and secure).
- In your WordPress dashboard, go to Plugins → Add Plugin, install All in One Login and activate it.
- Go to the All in One Login dashboard, click on Configure under Custom Login URL.
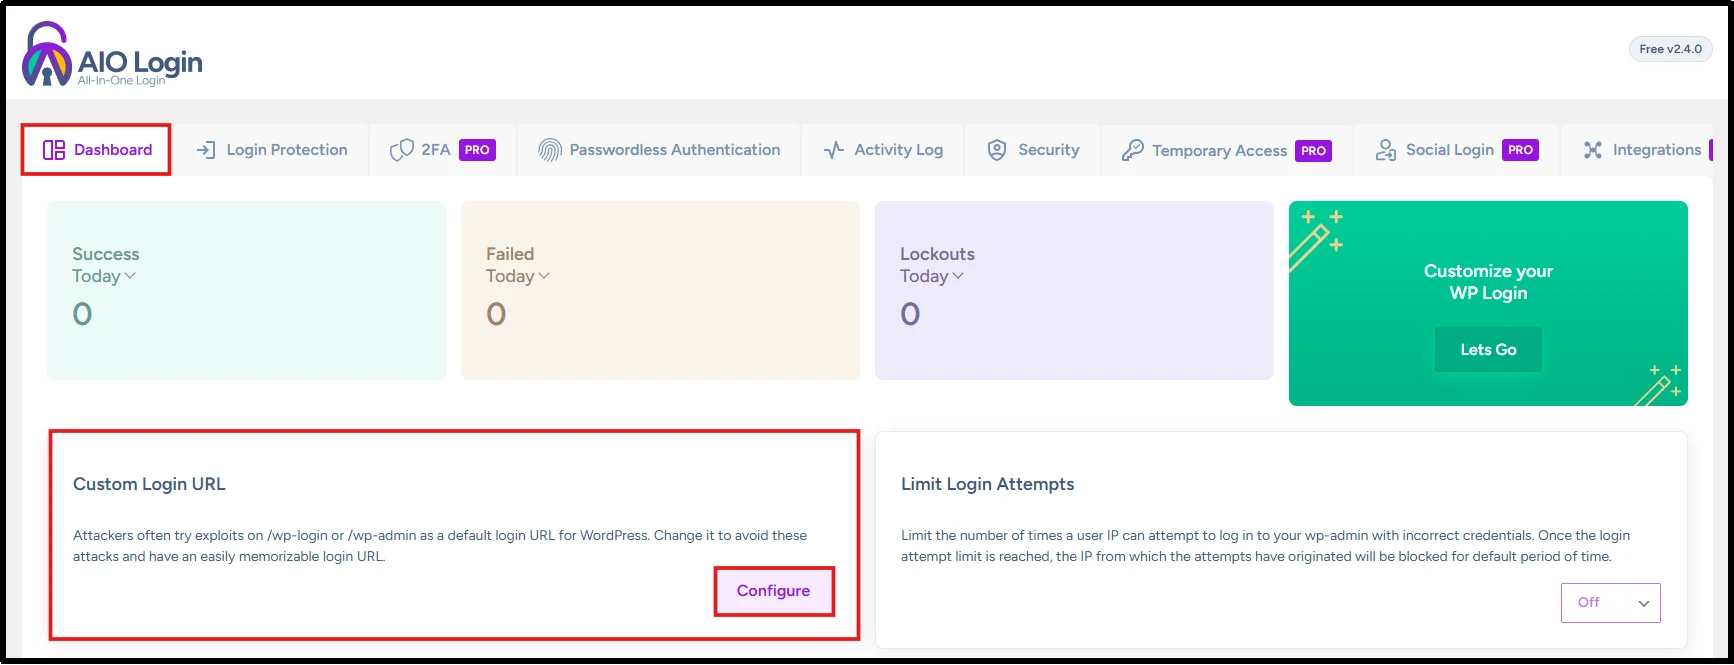
- Enable “Change wp-admin login”, set a Login URL and Redirect URL (optional).
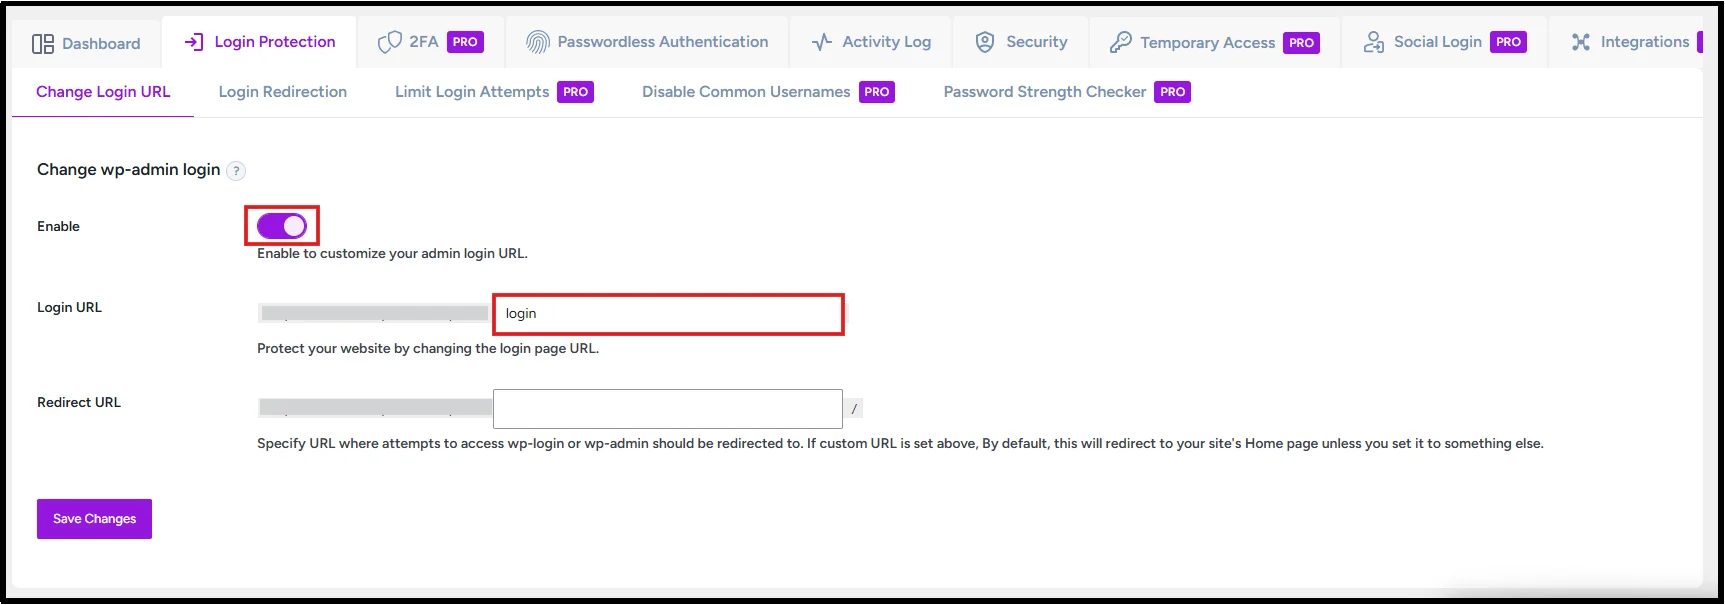
- Save Changes.
Depending on your configuration, visitors accessing the old login URL may see a 404 page, get redirected elsewhere, or receive another response defined by the plugin’s settings.
This won’t stop a targeted human attacker who already knows your real URL, but it silently filters out the overwhelming majority of bot traffic.
Pair it with Method 2: think of this as hiding the door, and password-protecting the directory as locking it. Security through obscurity alone is never enough, but reducing automated discovery significantly lowers unnecessary login attempts.
Do both, and you’ve covered visibility and access in one move.
Method 4: Enable Two-Factor Authentication (2FA)
Two-factor authentication prevents attackers from accessing your account even if they steal your password through phishing, credential stuffing, or a previous data breach.
2FA adds a second, time-sensitive step after your password – usually a 6-digit code generated by an authenticator app on your phone using TOTP (time-based one-time password).
- Popular options: Wordfence, Google Authenticator (via a 2FA plugin), WP 2FA, or miniOrange.
- Setup is typically: get All in One Login Pro → choose any one of the 2FA authentication methods → Enable → Configure it, and you are good to go.
- It’s widely regarded as the single most effective account-level protection available, because a stolen password alone is no longer enough to get in.
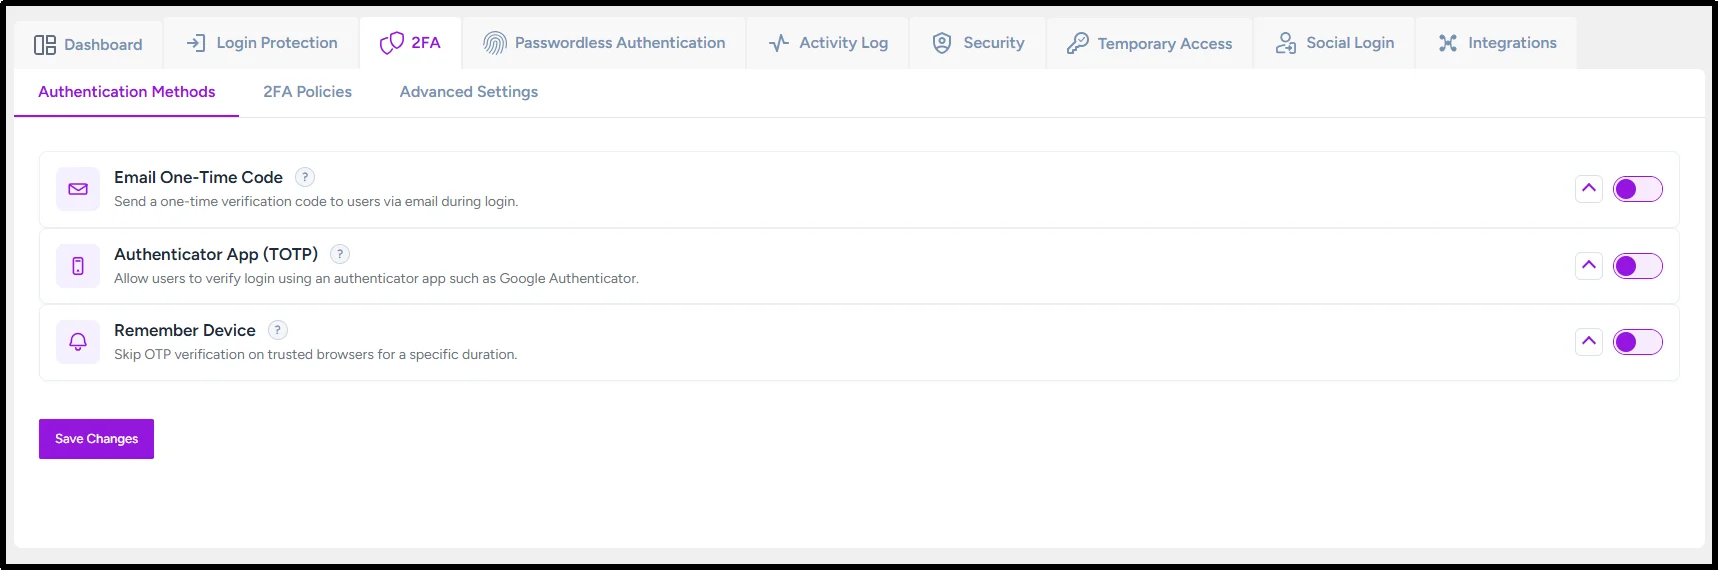
2FA is widely regarded as one of the most effective forms of login authentication available, because a stolen password alone is no longer enough to get in. Even if someone somehow captures or guesses your password, they still can’t log in without your phone in hand.
Setup takes about three minutes and can save you from what could otherwise be days of cleanup and recovery.
Method 5: Limit Login Attempts
By default, WordPress lets anyone attempt to log in as many times as they want, which is exactly what brute-force tools are designed to exploit.
- Go to Password Protected → Security → Attempt Limitation
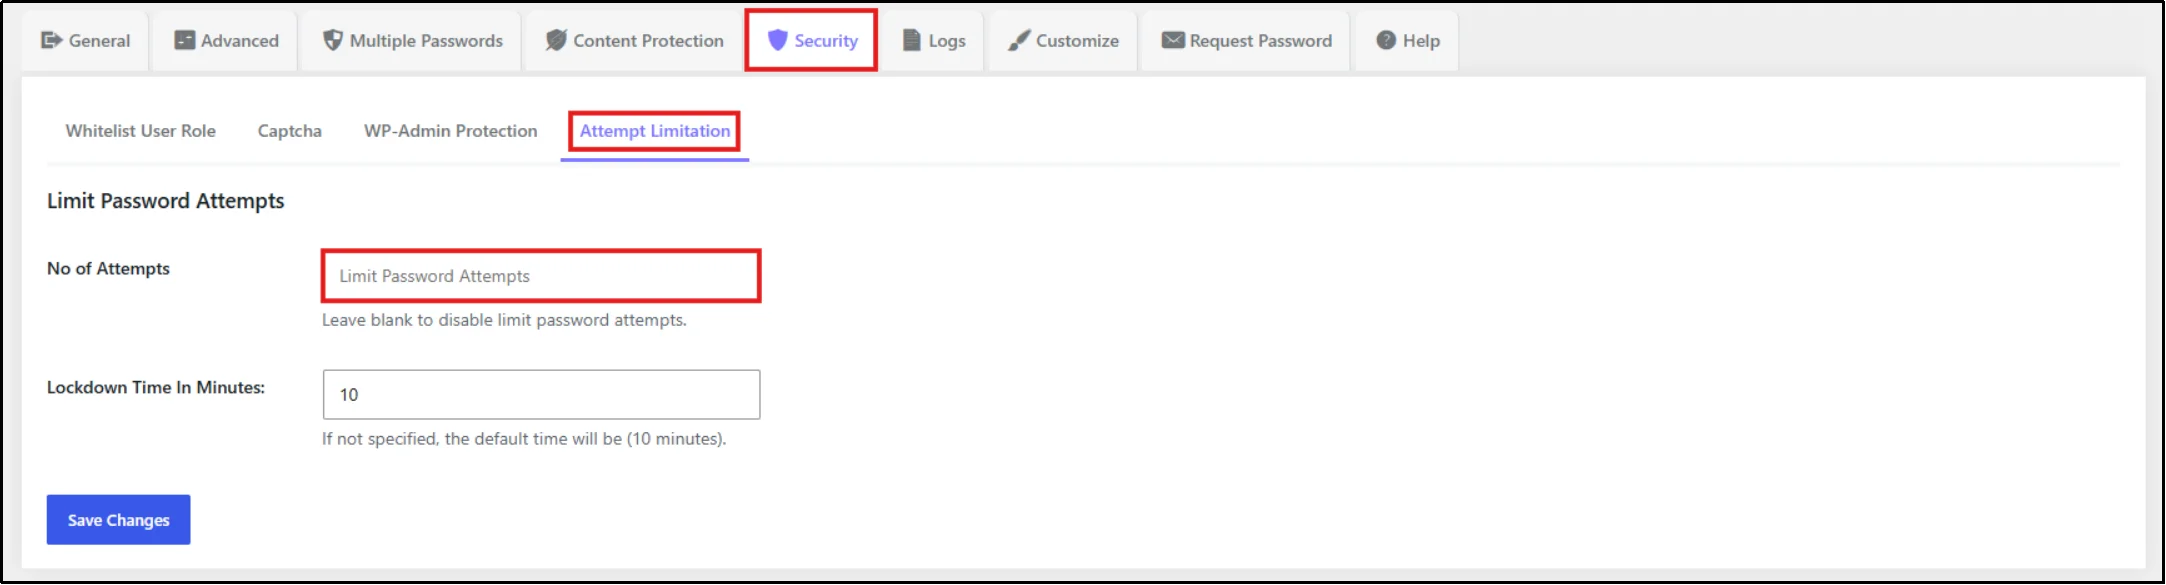
- A sensible starting point: 5 failed attempts trigger a temporary lockout, often for 15 minutes or longer.
- If you ever lock yourself out, you can recover access via FTP or your hosting file manager by temporarily disabling the plugin.
Login attempt limits significantly reduce automated brute-force attacks by temporarily blocking repeated failed login attempts, which is one of the most common forms of unauthorized login activity WordPress sites face.
Method 6: Add a Web Application Firewall (WAF)
A WAF filters malicious traffic before it ever reaches your site, rather than reacting after the fact.
- DNS-level WAF (like Cloudflare): free tier available, filters traffic at the network edge before it hits your server.
- Plugin-level WAF (like Wordfence or NinjaFirewall): runs inside WordPress; Wordfence recommends running in “learning mode” for about a week before switching to full blocking.
Either option adds a meaningful layer; though it’s more about traffic filtering than admin-area access, it is still worth setting up, but it works best alongside the methods above rather than instead of them.
Method 7: Restrict Admin Access by IP Address (Advanced)
For the strictest security setup, restrict /wp-admin/ access to specific IP addresses only. The server blocks everyone else outright, requiring no password prompt.
Add the following to your .htaccess file (replace with your actual static IP):
<Files wp-login.php>
# For Apache 2.4 (Modern Standard – Use this for most hosts)
Require all denied
Require ip xxx.xxx.xxx.xxx
# For Apache 2.2 (Legacy – only use if your host uses an older server)
# order deny,allow
# deny from all
# allow from xxx.xxx.xxx.xxx
</Files>
Many outdated tutorials still use the older Apache 2.2 syntax (order deny,allow). However, modern servers run Apache 2.4, which uses the Require ip directive. Always check your server’s Apache version before editing your .htaccess file.
Important: This method only works reliably if you (and your team) use a static IP address. If your ISP assigns you a dynamic IP that changes frequently, you will lock yourself out. This approach works exceptionally well for a small, fixed team working from known locations, but carries high risk for flexible remote workers. For most sites, Methods 2 and 4 deliver maximum protection with zero risk of self-lockout.
Method 8: Enforce SSL/HTTPS on the Admin Area
If your admin login isn’t running over HTTPS, your login credentials travel across the network in plaintext – visible to anyone positioned to intercept it, especially on public or shared networks.
- Most hosts now issue a free SSL certificate automatically → check your hosting dashboard if you’re not sure yours is active.
- In wp-config.php, add define(‘FORCE_SSL_ADMIN’, true); to force every admin session over HTTPS, even if a visitor manually types http://.
- Confirm it’s working by checking for the padlock icon in your browser bar while logged into wp-admin.
This is a one-time, five-minute setup that closes a surprisingly common gap: sites with SSL on the public-facing pages but not enforced on the admin login itself.
Method 9: Disable Login Error Hints
By default, WordPress provides overly specific error messages. If you enter the wrong username, the system tells you the username doesn’t exist. If you enter the wrong password, it confirms the username is correct. This hands attackers a free roadmap to guess your credentials.
Replace these default error messages with a single, generic warning like “Login failed – check your credentials.” This gives an attacker zero feedback on whether they guessed the username correctly, the password correctly, or neither. It removes a critical piece of data that brute-force tools use to narrow down their attacks.
Method 10: Add CAPTCHA to Your Login Page
CAPTCHA adds a simple “prove you’re human” step to your login form. It can be a checkbox, image puzzle, or invisible background check, depending on which version you use.
- Google reCAPTCHA (v3, invisible) is the most common choice – it scores traffic in the background without interrupting real users.
- With the All in One Login plugin, you can add CAPTCHA to your WordPress login page in a few clicks.
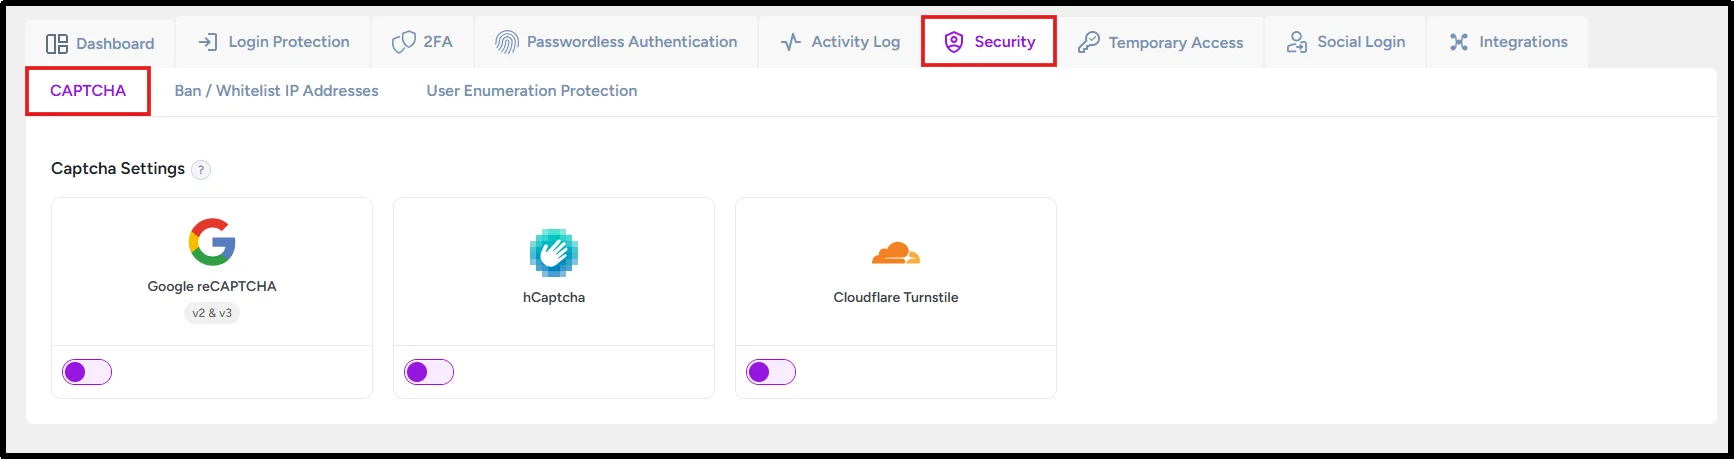
- This specifically targets automated bots, which make up the vast majority of brute-force login attempts – a human attacker can still get past it, but the scripts that hammer your login page thousands of times a day generally can’t.
Pair this with Method 5 (limiting login attempts) for a combination that filters out both automated bots and repeated manual guessing.
Side by Side Comparison: WordPress Admin Security Methods
Not sure where to start? Here’s how all ten methods stacked side by side for easier comparison:
| Method | Security Impact | Effort | Plugin? | Best For |
| 1. Strong Credentials | Medium | Easy | No | Every site |
| 2. Password-Protect wp-admin | Very High | Easy | Yes | Every site |
| 3. Custom Login URL | Medium | Easy | Yes | Every site |
| 4. Two-Factor Authentication | Very High | Easy | Yes | Every site, especially multi-author |
| 5. Limit Login Attempts | High | Easy | Yes | Every site |
| 6. Web Application Firewall | High | Medium | Optional | High-traffic or high-value sites |
| 7. IP Restriction | Very High | Hard | No | Fixed teams with static IPs only |
| 8. Enforce SSL/HTTPS | Medium | Easy | No | Every site |
| 9. Disable Login Error Hints | Low–Medium | Easy | Optional | Every site |
| 10. CAPTCHA on Login | Medium | Easy | Yes | Sites facing heavy bot traffic |
You don’t need all ten to feel confident. Methods 1, 2, 4, 5, and 8 are easy and fast to execute and cover the majority of real-world attacks. Meanwhile, 6, 7, 9, and 10 are the additional layers of security once the fundamentals are in place.
WordPress Admin Security Quick Checklist
Work through this checklist to improve your WordPress admin security and reduce the risk of unauthorized access.
 Changed default admin username
- Using a strong password (12+ characters, mixed case, numbers, symbols)
- Password-protected the wp-admin directory (Password Protected plugin)
- Changed the default login URL
- Enabled 2FA on all admin accounts
- Limited login attempts (3–5 tries before lockout)
- Installed a WAF (Cloudflare or Wordfence)
- (Optional) Restricted admin access by IP
- SSL/HTTPS enforced across the admin area
- Disabled default login error hints
- Added CAPTCHA to the login page
- Kept WordPress core, plugins, and themes updated
 Changed default admin username
 Using a strong password (12+ characters, mixed case, numbers, symbols)
 Password-protected the wp-admin directory (Password Protected plugin)
 Changed the default login URL
 Enabled 2FA on all admin accounts
 Limited login attempts (3–5 tries before lockout)
 Installed a WAF (Cloudflare or Wordfence)
 (Optional) Restricted admin access by IP
 SSL/HTTPS enforced across the admin area
 Disabled default login error hints
 Added CAPTCHA to the login page
 Kept WordPress core, plugins, and themes updated
Protect WordPress Admin Area – Layer by Layer
No single method makes your site 100% secure, but layers, stacked together, get remarkably close.
If you do nothing else today, start with the fastest, highest-impact wins: password-protect your wp-admin directory and tighten up your credentials. Add 2FA, login limits, and SSL enforcement this week. Schedule the WAF, CAPTCHA, error-hint cleanup, and IP restriction for later.
Your admin area is the front door to everything you’ve built. Don’t leave it wide open.
The fastest place to start: secure your wp-admin directory in about two minutes with the Password Protected plugin.
Frequently Asked Questions
What’s the single most important thing I can do to protect the WordPress admin area?
Password-protecting the wp-admin directory itself (Method 2) provides the highest security return for the least effort. It blocks unauthorized visitors before they ever see your login form.
Is password-protecting wp-admin better than changing the login URL?
They solve different vulnerabilities. A custom login URL mainly filters out bots that don’t know where to look. Directory password protection blocks anyone who lacks the password, regardless of whether they found the URL. Implementing both provides superior layered coverage.
Can I use the Password Protected plugin alongside other security plugins?
Yes. We designed it to complement tools like Wordfence, Sucuri, or Cloudflare. Password Protected guards the wp-admin “front door,” while other security plugins handle firewalling, malware scanning, and background monitoring.
Will password-protecting wp-admin slow down my site?
No. The password check only triggers when someone attempts to access the admin area. Regular visitors browsing your public site never encounter it, ensuring zero performance impact on your frontend.
What happens if I forget my wp-admin password?
You can easily recover access via FTP or your hosting file manager by temporarily deactivating the plugin (renaming its folder). This restores normal access so you can reset the password safely.
Do I need coding skills to protect my admin area?
Not for most of this guide. Methods 2, 4, 5, and 10 (Password Protected, 2FA, login limits, CAPTCHA) require zero coding. Methods 7, 8, and 9 involve minor configuration or short code snippets, but none require advanced technical expertise.
Do I really need all 10 methods?
No. Methods 1, 2, 4, 5, and 8 establish strong baseline protection in under 15 minutes. The remaining methods serve as advanced layers you can add as your site grows or your risk profile changes.