Do you want to make the post and pages you built using Elementor?
Elementor is one of the most popular WordPress page builders, making it easy to design professional pages without code. But sometimes you need to restrict access and show your Elementor content only to specific users.
That’s where password protection becomes essential.
Visitors must enter a valid password before they can view the page, which keeps your content protected from unauthorized access. WordPress includes a built-in password protection option, but it’s extremely limited. Before we start, let’s look at what it can and can’t do.
What is Password Protection?
Password protection is a simple content security method that lets you control who can view specific pages or posts on your website, much like putting a digital lock on a door.
When you password-protect a page or post, its content becomes hidden until a visitor enters the correct password.
Only those who know the correct password can view the hidden content. Here are the most common reasons to password-protect Elementor pages or WordPress content:
- Sharing Private Content: Share sensitive information with clients, teams, or small groups without exposing it publicly.
- Create Simple Membership Areas: Offer exclusive content, downloads, or resources only to users with access.
- Pre-launch or Beta Testing: Before your new product or service goes fully live, you can share the draft page with testers for feedback. The public cannot see the unfinished content.
- Protecting Premium Assets: If you sell digital products like e-books or courses, password protection ensures only paying customers can download the files.
Why is WordPress’s Default Password Protection Feature Insufficient?
As discussed, password protection is a default WordPress visibility feature. However, the feature is too limited to give you the control you need to protect an entire website or a complex set of Elementor pages.
It often cannot handle the different needs we just discussed, such as creating a full membership area or protecting multiple items at once.
Key limitations of WordPress’ default password protection include:
- One password per page/post: You must share the same password with all users.
- No sitewide or bulk protection: You can’t protect multiple pages, categories, or entire websites.
- No design customization: The default password screen looks basic and off-brand.
- No password expiration: You can’t set temporary or time-limited access.
These limitations make it difficult to manage private content, especially when working with multiple clients, user groups, or membership areas. That’s why a dedicated content protection plugin is essential.
How To Password-Protect Posts and Pages in Elementor?
Elementor handles page design, not content security, so it doesn’t offer built-in password protection. And since WordPress’s default feature is too limited, the best way to secure Elementor pages is with a dedicated password protection plugin.
As we discussed, the default password feature that comes with WordPress also has many problems. It is not strong enough to protect your entire site or manage multiple user groups.
Because of these limits, the only reliable way to lock down your Elementor pages is to use a powerful WordPress plugin designed just for this job.
For reliable, flexible, and professional content security, the best choice is the Password Protected plugin. With over 300,000 active installations, it integrates seamlessly with Elementor and gives you complete control over who can access your content.
The plugin gives you complete control over who can see your private Elementor content.
The plugin boasts several helpful features, including:
- Protect Unlimited WordPress & Elementor Content: You can easily add passwords to any post, page, or even custom post types, such as WooCommerce product pages.
- Protect Specific Sections Inside Elementor Pages (Partial Protection): This feature lets you lock down only a specific part of a page or post. You can secure text, images, or download links while leaving a “teaser” for the public to see. It works perfectly with Elementor and other builders.
- Create and Manage Multiple Passwords Per Page: You are not limited to one password per page. You can create and manage many unique passwords for a single piece of content. This makes it simple to give a different key to each user or client.
- Limit Failed Password Attempts for Better Security: For better security, you can set a limit on how many times a user can try to enter the password. This protects your content against brute force attacks (where a computer tries many passwords very fast).
- Add Password Expiry Dates for Temporary Access: You can set a date when a password will stop working. This is great for limited-time offers or for granting temporary access to a project.
- Generate Secure Bypass Links for Instant Access Without Passwords: You can create special, password-free links for any content. This allows you to share protected pages with trusted users quickly or for internal testing without requiring them to enter a password.
Check out all the plugin’s features on the features page.
Password Protect Posts/Pages in Elementor in 3 Easy Steps
Now that you understand the power and flexibility of the Password Protected plugin, let’s go over the simple steps required to install it and begin securing your Elementor pages.
Step 1: Install and Activate the Password Protected Plugin
Start by installing the Password Protected plugin on your WordPress site.
- Log in to your WordPress admin dashboard.
- Navigate to the Plugins menu and then click Add Plugin.
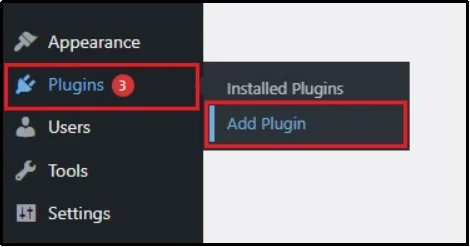
- In the search bar, type “Password Protected.”
- Find the plugin by Saad Iqbal and click the Install Now button.
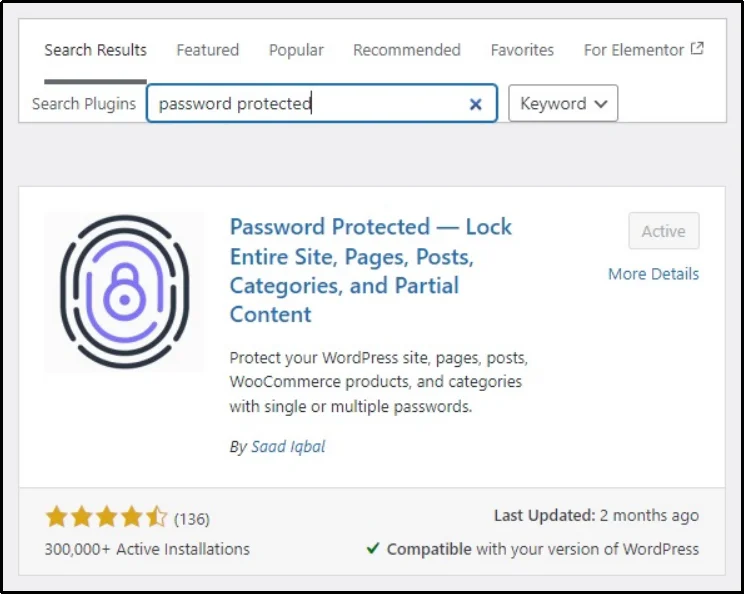
- Once the installation finishes, click the Activate Plugin button. The plugin is now ready to use!
The free version works well for basic protection. However, the premium version unlocks advanced features like multiple passwords, bypass links, password logs, expiration rules, and more. It’s ideal for membership sites, client pages, or private download areas.
If you want to go with the premium version, follow the remaining steps:
- Go to Password Protected’s pricing page and purchase a plan of your choice.
- You’ll receive an email containing the premium ZIP file and your license key.
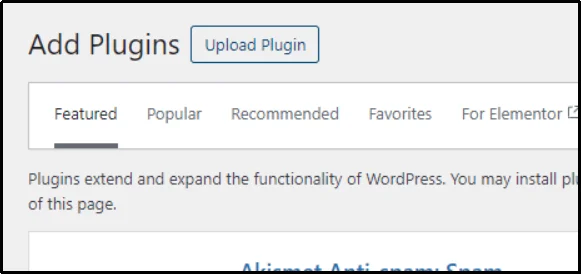
- Download the ZIP file, then go to Plugins → Add New → Upload Plugin in your WordPress dashboard.
- Upload the file, install it, and activate the plugin.
- Enter your license key when prompted to unlock all premium features.
- Click Choose File, then locate the plugin ZIP file.
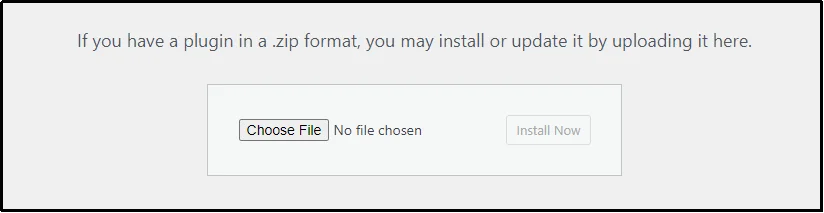
- Press the Install Now button.
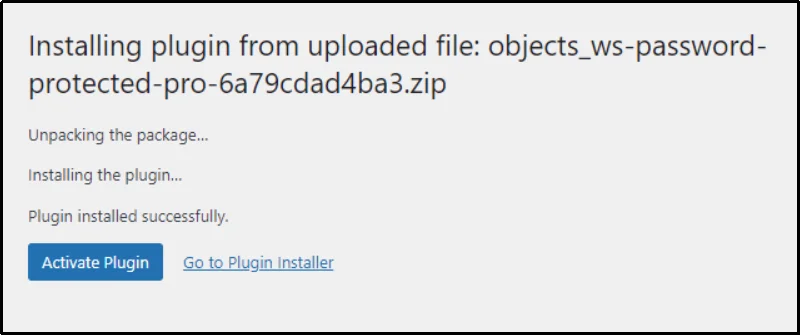
- Once the plugin is installed, click Activate Plugin.
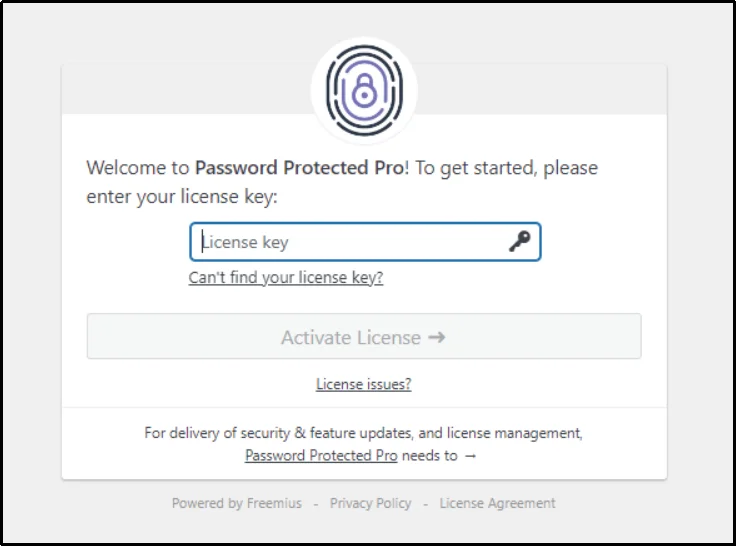
- Enter the license key on the subsequent screen, and congratulations! Now you are free to utilize the plugin to the fullest.
Step 2: Enable Password Protection for Your Elementor Pages
After installing the plugin, enable individual content protection so the password fields appear inside your posts and Elementor pages.
- Go to your WordPress admin dashboard.
- Find and click the Password Protected menu item in the left sidebar.
- Navigate to the Content Protection tab at the top, then click the Post Type Protection sub-tab.
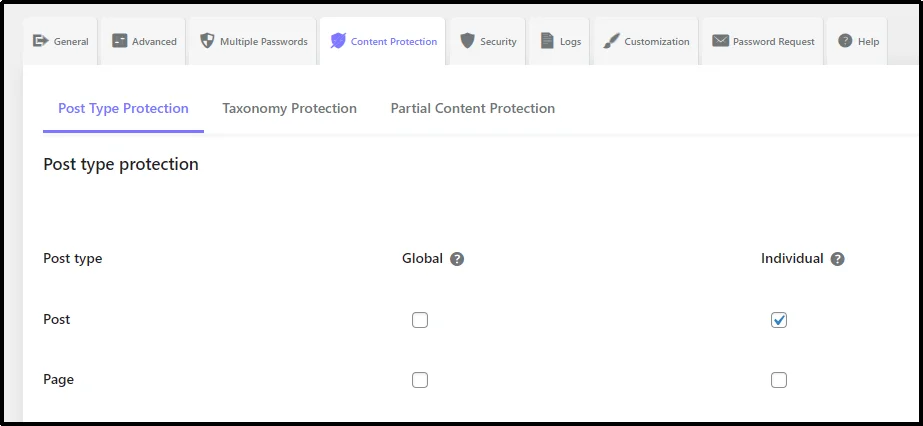
- In the section for Posts and Pages, check the Individual box for the content type you want to protect. This ensures the password options are visible when you edit that content.
The Password Protected plugin offers multiple options for password protection. You can protect any post type individually or globally (globally means locking the chosen entire post type as a whole). Checking the required box will enable the kind of protection you want.
As you can see in the earlier posted image, we enabled the individual post protection.
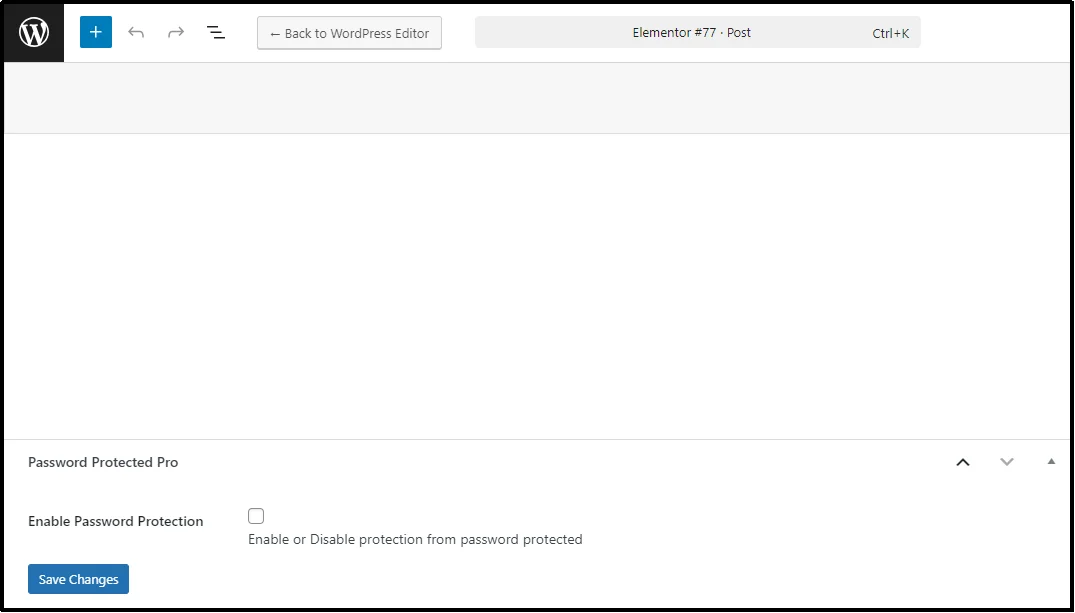
- Now, go to the specific Elementor page or post you wish to secure and click Edit.
- Scroll down below the content editor until you find the Password Protected settings box.
- Check the “Enable Password Protection” box, then click “Save Changes.”
- New fields will appear, allowing you to create your password. Create a new password that users must enter before accessing the page/post.
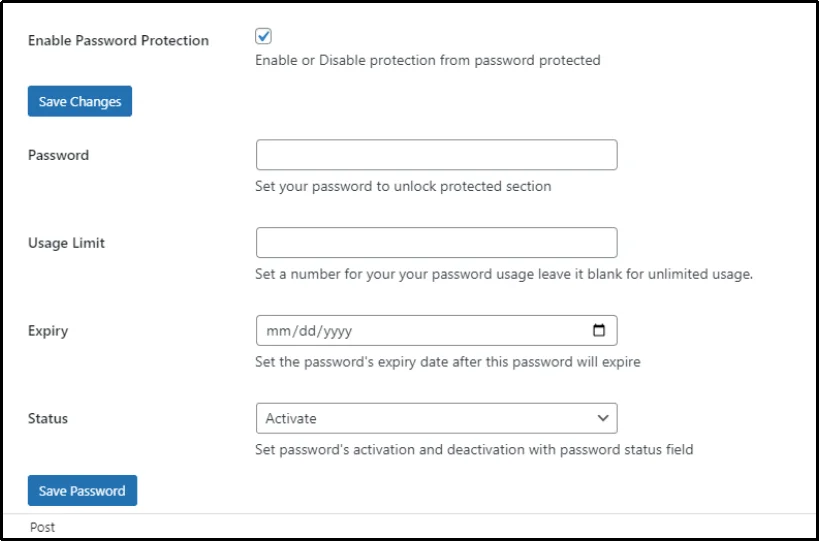
- You can also further customize access by setting a Usage Limit (the number of times the password can be used) and an Expiry date (when the password will automatically stop working).
- Finally, click Save Password to lock your content.
This method works perfectly whether you built your page with the default WordPress editor or with the Elementor page builder. Once saved, anyone visiting that content will be prompted to enter the custom password.
Step 3: Test Your Password-Protected Elementor Page
After you are done with the settings, double-check them and ensure they are consistent with your vision. Afterward, save the page’s changes. Go to the page, and you should find a password screen.
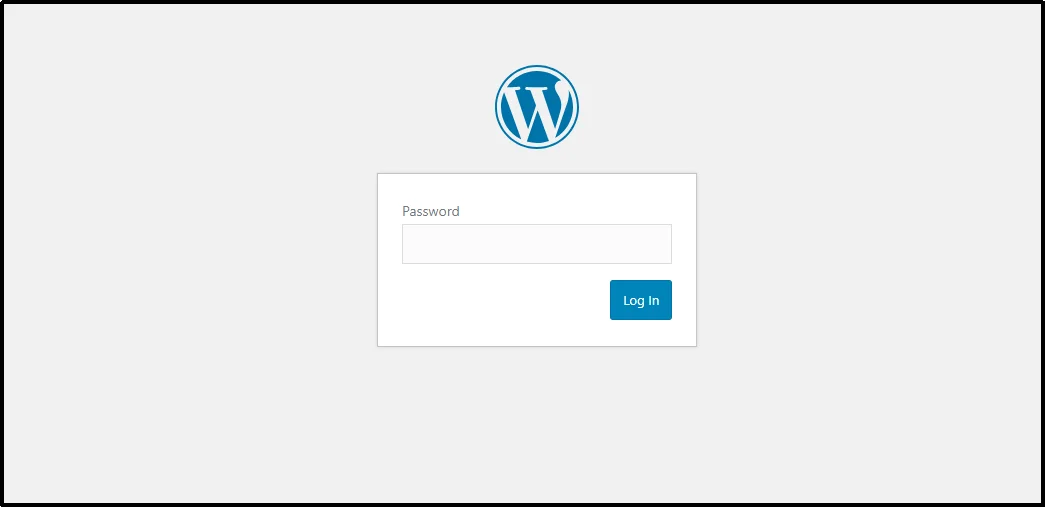
Enter the password that you just set, and there you go! I can easily access the password-protected screen.

Similarly, test each change you make with password protection. Although both plugins are perfectly compatible, other themes/plugins may conflict with each other.
It’s always better to find the problems yourself than to let users find and report—or worse, exploit—them.
Step 4: Customize Your Password Screen (Optional)
Since Elementor builds beautiful, professional pages or posts, when a visitor is hit with a bland, generic-looking password-protected screen, they can spiral and feel out of place. It makes the security layer seem like it doesn’t belong to your brand.
Luckily, the Password Protected plugin offers powerful customization tools to solve this problem. Since the custom login screen is the first thing a user sees before accessing your content, it must match your site’s look and feel.
You can fully customize this screen using the plugin’s settings:
- Branding: Easily upload your company logo to the screen. This immediately tells visitors they are in the right place and keeps your brand visible.
- Colors and Style: You can change the background color, adjust the color of the password box, and even change the style of the submit button to match your website’s main colors.
- Fonts: Select a font style and size for the text to ensure it looks consistent with the rest of your Elementor design.
- Background Image: Instead of a plain color, you can even upload a background image to make the password screen more visually appealing.
You might want to read this 👉 How to Customize WordPress Password Protected Screen [Step-by-Step]
By taking a few minutes to customize the password screen, you create a smooth, professional experience for your users.
There’s More to Password Protected
We have shown you how easy it is to protect individual Elementor pages, but the Password Protected plugin offers much more than just simple page locking.
We already talked about how the default WordPress feature fails at sitewide protection. This plugin easily lets you lock down your entire website with a single click. You can also protect specific categories or tags of content all at once, which is perfect for securing large member areas.
For better security, the plugin adds Google reCAPTCHA to the password screen to protect against hackers. Plus, you get detailed Password Attempt Logs so you can always see who is trying to access your protected content, when they tried, and which device they used.
It even lets you whitelist specific IPs so they never need to enter a password.
If you are serious about securing your whole site, managing private user groups, and using the most advanced security tools, you need Password Protected Pro! Upgrade today and gain total control over all your private content!
Frequently Asked Questions
How do I password protect a page in WordPress using Elementor?
To password-protect an Elementor page, install the Password Protected plugin because Elementor doesn’t handle content protection natively. After activation, edit your page, open the Password Protected box, enable protection, and set your password.
How to make a page private in Elementor?
You can make a page private using WordPress’s visibility settings. Edit the page and change the Visibility option to Private. Only logged-in Editors and Administrators can access it. For more flexible privacy control, use the Password Protected plugin.
How do I hide a page in Elementor?
To hide an Elementor page, change its Visibility settings in WordPress or add password protection using the Password Protected plugin. This hides the content from everyone except users with the correct password.