Do you want to password protect your WordPress? You’ve landed on the right page.
WordPress powers more than 45% of all websites worldwide, which makes it the most popular content management system. But with an abundance of users comes bad actors.
In 2025, security threats are becoming smarter, which means your defenses need to evolve too.
This article breaks down the essential WordPress password protection best practices. We’ll cover the basics of WordPress security. Then, at the end, we’ll show you how to use a dedicated tool to secure your private content and entire site.
Why Password Protect WordPress?
The rise of artificial intelligence is reshaping cyber hacking. In fact, a study found that 80% of the cyberattacks nowadays involve artificial intelligence.
Hackers now use AI to generate advanced malware, run realistic phishing campaigns, and perform automated password cracking that can easily bypass weak passwords. Because these automated attacks are faster and more personal, your website needs strong layers of defense.
Another major risk comes from plugins and themes developed by third parties. A study revealed that about 99% of all new security flaws in the WordPress ecosystem were found in plugins or themes.
This constant stream of new vulnerabilities means that even a well-maintained site can be targeted. Therefore, adding an essential layer of security, like password protection, is critical for protecting your content from unauthorized access and keeping it safe from these ever-present online threats.
WordPress Password Protection Best Practices
1. Two-Factor Authentication (2FA)
The most powerful step you can take today is to use Two-Factor Authentication (2FA). 2FA is a security method that requires two pieces of evidence to prove you are who you say you are.
This extra step usually involves a time-sensitive code sent to your mobile phone or a special app. This additional barrier is what locks out hackers, even if they somehow steal your original password.
This extra layer of defense is one of the most effective ways to stop automated attacks. Google has proved that two-factor authentication (2FA) can block up to 100% of automated attacks. It’s crucial for any site, especially if you handle customer information or payments. This added layer of protection means that unauthorized access, which could lead to real financial risk, is significantly lowered.
Think of 2FA as an extra lock on your front door, as even if someone steals your key (password), they can’t get in without a second code. Even with the stolen key (your password), the thief still cannot get past the strong lock with a unique code.
For the best security, always use a dedicated authenticator app on your phone instead of getting codes through SMS text messages. Codes sent via text can sometimes be exposed to sneaky tricks like SIM-swapping attacks, where a hacker tricks a phone company into giving them your phone number. Authenticator apps provide a much more reliable defense.
You should make using 2FA a mandatory rule for everyone on your site who has the ability to change anything.
2. Hide the Default Login URL
Your second critical defense step is to hide the standard WordPress login page address. By default, every WordPress site uses the same predictable paths: yourdomain.com/wp-login.php or yourdomain.com/wp-admin.
These default URLs are easy for bots and hacking tools to find and attack repeatedly. This constant hammering is known as a brute-force attack, where the goal is to guess your credentials or simply overload your server until it crashes.
Changing this default address is often referred to as security through obscurity, which is a way to reduce your exposure to random threats. If an attacker cannot find the admin login URL, they cannot attempt brute force attacks or overwhelm the system.
While it doesn’t replace strong passwords or 2FA, it greatly reduces the number of automated bots trying to access your site. Bots are often coded to append “/wp-admin” or “/wp-login.php” to the website’s URL, allowing them to find the login URL. Changing the login page can help protect against such bots.
You should change the default URL to something unique and non-obvious, like yourdomain.com/my-unique-login or something that doesn’t even include keywords like login or admin.
This simple change means that the vast majority of scanning bots will find nothing at the old address and move on.
You can also enhance WP-Admin security by adding another password after the regular username and password. To do so, go to the “Security” tab in the Password Protected plugin’s settings and then move on to the “WP-Admin Protection” subtab.
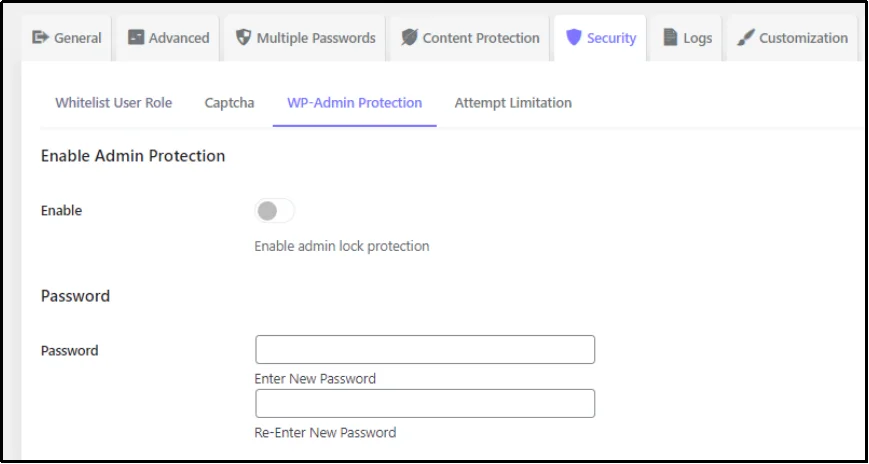
Once there, just enable the admin lock protection using the Enable toggle button.
Next, write the new password and re-enter the new password in the respective boxes, and save settings using the Save Changes button.
3. Limit Login Attempts
A brute-force attack occurs when a hacker (or a bot) quickly and repeatedly tries many different usernames and password combinations until one works, gaining unauthorized access.
By default, WordPress doesn’t limit how many times someone can try to log in, leaving your site highly vulnerable to these attacks.
Limiting the number of login attempts is one of the most effective and simplest security steps you can take.
By setting a maximum number of tries, you block the automatic scripts that hackers use, as they rely on being able to try thousands of combinations. For example, you can set the limit to five attempts. If someone (or a bot) fails to log in five times, the system will temporarily lock them out for a set period, such as 20 minutes, effectively stopping the attack in its tracks.
Experts recommend allowing only three to five failed login attempts before locking the user out. This balance keeps your site secure while ensuring that legitimate users who mistype their password do not get locked out too easily.
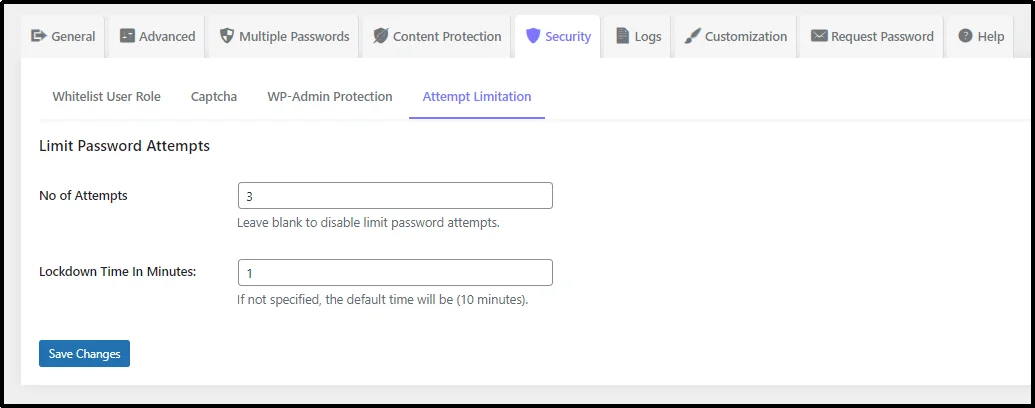
You can add this protection using the Password Protected WordPress plugin. This simple measure dramatically increases your website’s security against one of the most common hacking methods on the web.
To activate it, go to Password Protected settings and the Security tab. Once there, move on to the Attempt Limitation subtab. Enter the number of attempts and the timeout in minutes. Writing “3” will allow three attempts before locking the user out for the number of minutes in the following box.
4. Use Strong and Unique Passwords
The most basic, yet often overlooked, defense against bad actors is a strong and unique password.
A weak password is the easiest way for hackers to get into your site. When hackers steal passwords, they don’t try to guess them one by one. Instead, they use massive lists of passwords from old data leaks.
The most dangerous thing you can do is reuse the same password on multiple sites. If a hacker steals the password from one site, they will immediately try it on all your other accounts, including your WordPress website. This is why having a unique password for every account is non-negotiable.
A strong password should be at least 12-14 characters long and use a mix of uppercase and lowercase letters, numbers, and symbols. The longer and more complex the password, the harder it is for automated tools to crack it. For instance, a simple 8-character password can be broken easily, but a 15-character complex password would take a machine many years to crack.
Because remembering dozens of strong passwords is unrealistic, use a password manager. A password manager is an application that safely stores all your passwords and can even create extremely strong, unique passwords for you. By using a password manager, you only need to remember one master password to unlock all your others. This simple step is a huge leap forward in keeping your entire digital life safe.
5. Keep Everything Updated
This may sound simple, but running outdated software is one of the most common reasons a website gets hacked. Developers of WordPress, as well as the developers of plugins and themes, are constantly finding and fixing security holes. When they release an update, it often includes a “patch,” which is a fix for a known vulnerability.
For example, a security flaw in a popular cache plugin affected over 5 million websites before developers released a fix.
Hackers know that many site owners are slow to update, and they actively search for websites running older, exposed versions.
You need to update three main things:
- WordPress Core: The main software for your site. The WordPress security team is always releasing updates with security fixes.
- Plugins: They are a common source of security flaws. As we learned, a massive 99% of all new security flaws found in the WordPress ecosystem come from plugins or themes.
- Themes: Like plugins, they can also have vulnerabilities.
For the best defense, you should apply all security updates immediately, ideally within 24 to 48 hours of them being released. If you wait, you are leaving an open door for hackers. Turn on automatic updates for minor security fixes to ensure you’re protected without delay. Remember, a quick update can stop a major problem before it even starts.
6. Add a Web Application Firewall (WAF)
A Web Application Firewall (WAF) is a vital security tool. It stands between your WordPress site and the internet, watching all the traffic that tries to get in. Its main job is to filter out and block any harmful or malicious requests before they can ever reach your website’s core files or server.
Research has shown that advanced WAFs using modern detection methods are highly effective, achieving up to a 96.6% detection rate for unknown zero-day threat
A WAF analyzes each incoming request based on its content, not just its source.It uses a set of rules to spot harmful patterns. For example, it blocks common threats like SQL injection and Cross-Site Scripting (XSS).
- A SQL injection attack happens when a hacker tries to put harmful code into your database to steal your data or even take control of your site.
- Cross-Site Scripting (XSS) attacks try to inject bad scripts (code) into your pages to attack your visitors.
By checking for these specific patterns, the WAF stops the attack before it can do any damage to your site.
This is a crucial step because it protects against application-level attacks that a normal, traditional firewall might miss. Advanced WAFs can even use techniques like behavioral analysis to detect brand new, or “zero-day,” threats that have not been publicly known yet.
Types of WAFs
There are multiple types of WAFs that you can deploy in a few different ways:
- Cloud-Based WAF: This is hosted by a third-party security provider, like Sucuri or Cloudflare. It sits at the edge of the network and blocks bad traffic before it even touches your server.
- Application-Level WAF: This is typically a WordPress security plugin. It works right inside your WordPress installation, which makes it very effective at stopping WordPress-specific attacks, such as those that target the login page.
Using a WAF is one of the most effective ways to stop cyberattacks. Research has shown that advanced WAFs using modern detection methods are highly effective, achieving up to a 96.6% detection rate for unknown zero-day threats. It is an essential layer of protection in your overall security plan.
7. Do Regular Backups
Even with all the strong defenses in place, you need a plan for when something goes wrong. This is where regular site backups become your ultimate safety net.
A backup is simply a copy of all your website files and database that you can use to restore your site quickly if it’s ever hacked, corrupted, or broken.
Having a recent backup can turn a potential disaster into a quick fix.
If a hacker manages to breach your defenses, the fastest way to get your site running again is to simply wipe the infected files and restore your clean, unhacked copy. Without a backup, you could face hours or days of costly downtime trying to clean up the mess.
Downtime can lead to lost revenue and damage your reputation with customers.
Best Practices for Your Backups
The most secure way to handle backups is to use the 3-2-1 rule, which is a simple, effective strategy. This means you should:
- Have at least three copies of your data (the live site plus two backups).
- Store the copies on two different types of media (like your server and an external cloud service).
- Keep one copy in an off-site location (like a remote cloud server). This rule ensures that a disaster on your primary server won’t destroy all your copies at once. Avoid relying solely on your web host’s backups, as these are often on the same server as your website. Always set up an independent backup solution that sends your copies to a completely different location.
8. Use a Dedicated WordPress Password Protection Plugin
While the best practices above are vital, you may need a simple way to secure your entire website or key pages without a complicated user system. Thereby, a plugin like Password Protected is necessary. It is often the easiest and fastest way to restrict who can see your content.
Why a Plugin is Better Than WordPress’s Built-in Settings
WordPress’s built-in settings have a basic password option for individual posts or pages, but it has three main limits:
- No Full Site Protection: The default setting cannot protect your entire website with a single password.
- Only One Password: You can only set one password per post, which makes sharing and access management difficult.
- No Extra Protection: The built-in option does not offer extra security features like limiting login attempts to stop brute-force attacks.
A dedicated plugin solves all these problems. It gives you an easy way to lock down your entire site (or a part of it) with one click, which is perfect for sites under construction, private client previews, or internal company pages.
The Benefits of Site-Wide Protection
A dedicated plugin allows you to:
- Lock Down the Entire Site: You can use a single master password to secure every page and post on your site instantly.
- Whitelist Key Users: You can allow administrators (admins) or specific User Roles to bypass (skip) the password screen. This keeps your team working smoothly while everyone else sees the lock screen.
- Stop Password Guessing Attacks: Password Protected includes common features, such as wp-admin protection and login attempt limits, that can help protect against automated password-guessing attacks, such as brute force, credential stuffing, dictionary, etc.
By adding this final, simple layer of dedicated password protection, you create a powerful security barrier for your content without having to build a complex membership site.
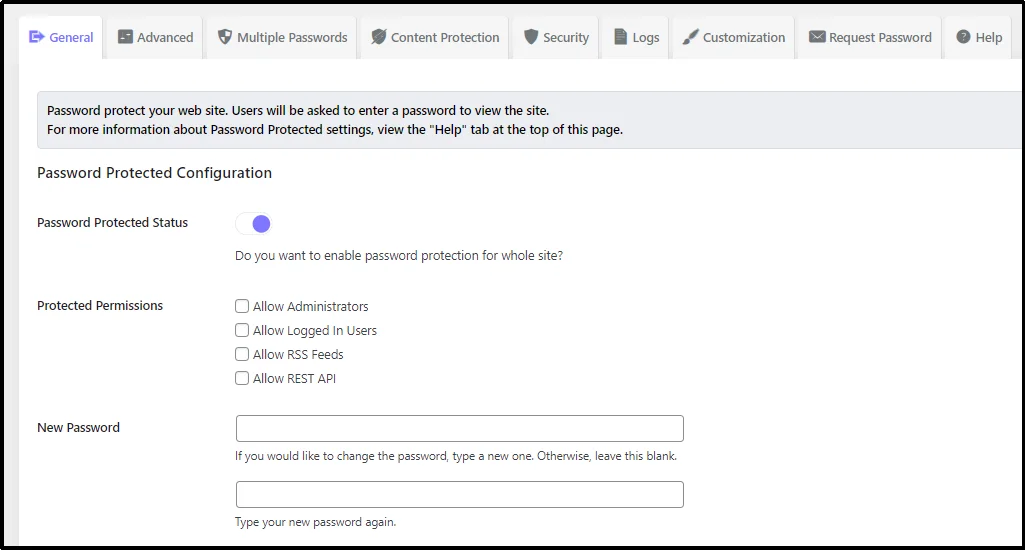
To secure your entire side with another layer of password-protected screen, go to the plugin’s settings and toggle the “Password Protected Status” button to open it. Create a new password in the respective input box, rewrite the password in the following box, and save changes.
Final Thoughts on WordPress Password Protection: Lock It Before You Lose It!
Every WordPress site, no matter how big or small, is a potential target. With automated attacks evolving faster than ever, relying only on strong passwords is never enough. That’s why combining 2FA, firewalls, login protection, backups, and updates is crucial to keeping hackers out.
As a cherry on top, add another password-protected screen with Password Protected plugin. This lightweight yet powerful plugin gives you the ability to lock your entire site behind a secure gate in just a few clicks.
Whether you want to keep client previews private, restrict access during maintenance, or prevent unauthorized visitors altogether, Password Protected gives you the flexibility and protection you need without complex setup or coding.
Even a few minutes of vulnerability can be risky, so now’s the perfect time to act. Install Password Protected today and take back control of who sees your WordPress site.
FAQs
What are the best practices for password protection?
The best WordPress password protection practices include enabling Two-Factor Authentication (2FA), hiding the default login URL, and limiting login attempts to prevent brute-force attacks. You should also use strong and unique passwords, keep WordPress core files, plugins, and themes updated, install a Web Application Firewall (WAF), and perform regular backups. Finally, adding a dedicated password protection plugin like Password Protected gives you an extra layer of defense by locking your entire site or selected pages with a secure password.
What is the best password protection plugin for a WordPress site?
The best password protection plugin for WordPress is Password Protected. It offers a simple yet powerful way to secure your entire website or selected areas with a single password. Along with security, you get other helpful features such as login attempt limits, WP-Admin protection, user whitelisting, and much more.
How do I password-protect my entire WordPress site?
You can easily password-protect your entire WordPress site using a plugin like Password Protected. This plugin allows you to lock down every page and post with a single password. It also lets you whitelist specific users, limit login attempts, and add WP-Admin protection for stronger defense. In the settings, simply enable the feature using the toggle button, create your password, and save changes.