Keeping a WordPress site private can be important for many reasons. You might be developing a new project, working on a redesign, or preparing content before launch.
In all these cases (and more that we will explore later), allowing search engines or visitors to access your site too early can create problems, such as competitors seeing your strategies, unfinished pages could confuse visitors, and early indexing can affect how your site appears in search results.
Fortunately, WordPress makes it simple to control who can access your site. With the right settings and tools, you can block search engines, require a password, or restrict access to specific users.
This guide covers five easy ways to hide your WordPress site from the public while you work on it, ensuring your content remains secure until you are ready to share it.
Why Should You Hide Your WordPress Site from the Public?
There are many situations where you may not want your site visible to everyone.
A common reason is development. If your site is under construction, showing incomplete designs or features can create a poor first impression. Thus, it’s important to keep visitors away from witnessing an unfinished project.
Another reason is privacy. You can create a personal blog, an internal company site, or a membership platform that should only be accessible to a specific audience.
Moreover, hiding your site can also protect sensitive information, such as draft content, client projects, or confidential updates, that should not be exposed to the public or competitors. In fact, if it did, you could face consequences for not complying with the necessary security protocols.
In some cases, you may also want to prevent search engines from indexing your site before it is ready. This avoids ranking issues and ensures the final version is what appears in search results.
5 Easy Ways to Hide a WordPress Site From Public
Now that you understand the importance of hiding a WordPress site from the public, here are five ways to do so.
1. Block All IPs Except Yours Using the .htaccess File
The .htaccess file is a configuration file used by Apache-based web servers to control important settings like redirects, access restrictions, and security rules. Because it operates at the server level, any changes you make here affect your entire site.
⚠ Warning: This method is very powerful and can easily lock you (and everyone else) out of your site if done incorrectly. If your internet provider uses a dynamic IP (your IP address changes periodically), you could accidentally block yourself. Always keep FTP or hosting panel access handy to revert changes if needed.
If you’re running Apache 2.4 or higher (which most modern hosting environments do), the correct code to block all visitors except your IP is:
# Block all access
Require all denied
# Allow only your IP
Require ip 123.45.67.89
Replace 123.45.67.89 with your actual public IP address.
To allow multiple IP addresses, list them on the same line:
Require ip 123.45.67.89 98.76.54.32
💡 Note:
- This method blocks all visitors, including search engine bots like Google. If you want bots to still crawl your site, you’ll need to whitelist their IPs too, which is tricky since they change often.
- Always make a backup of your .htaccess file before editing it.
Also Read: How to Password Protect WordPress Directory with .htaccess [Step-by-Step]
2. Restrict Access Using Your Hosting Control Panel
Most hosting providers offer a control panel, such as cPanel, Plesk, or a custom dashboard, which lets you manage your site without touching code. Many include built-in tools for blocking IP addresses, password-protecting directories, or limiting access in other ways.
For example, in cPanel:
- Use IP Blocker to deny access from unwanted addresses.
- Use Directory Privacy to password-protect a specific folder, such as your /wp-admin/ or the root directory of your staging site.
💡 Important Notes:
- Protecting the root folder will password-protect your entire site. However, if not configured correctly, it can break WordPress functionality (especially if caching/CDN is active).
- Some managed hosts (e.g., WP Engine, Kinsta, SiteGround) offer built-in staging site protection, which is safer than manually locking directories.
- If you block access to the wrong IP range, you could block yourself or legitimate services (like payment gateways).
However, hosting control panels come with drawbacks:
- Varies by provider: Not all hosting companies offer the same tools or features. Some panels may lack specific security options that we discussed above.
- Limited customization: Although safer than editing core files, control panel tools may lack advanced settings needed by developers, limiting flexibility for unique site needs.
- Possible downtime: Applying certain restrictions incorrectly can still make your site inaccessible. Although the consequences of mistakes are less severe than the previous method, they can still cause disruptions.
While hosting panels are more user-friendly than direct file edits, they still require careful use. Always follow your web hosting provider’s documentation and test changes after applying them.
3. Use WordPress Built-In Privacy Settings
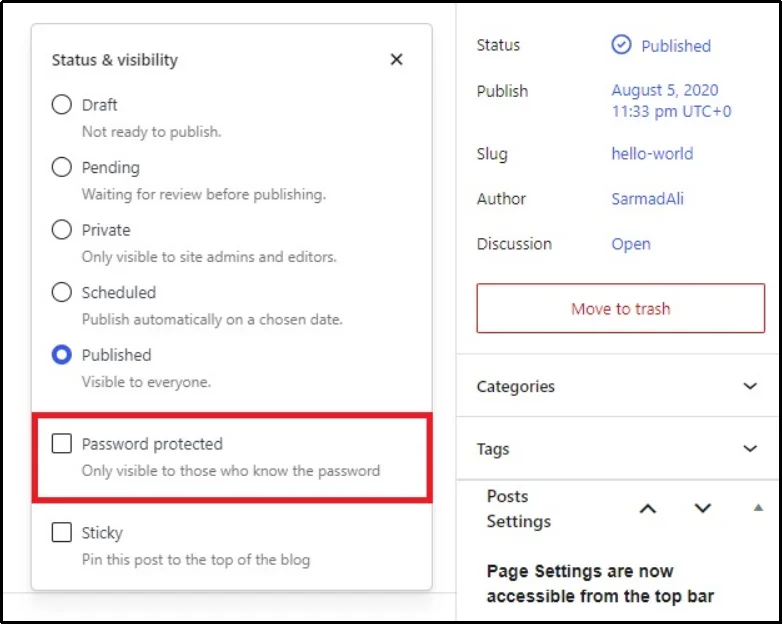
WordPress includes basic privacy features that allow you to hide individual posts or pages from public view. When editing content, you can change its visibility from “Public” to either Private or Password Protected. Here’s what they mean:
- Private: Only logged-in users with the correct role, such as Administrators or Editors, can view the content. For everyone else, the page or post is completely hidden.
- Password Protected: The content remains online, but visitors must enter a password to see it. Anyone with the correct password can access the page, even if they are not logged in.
These options can be useful if you are working on specific sections of your site, want to share drafts with a small audience, or need to restrict specific resources to selected individuals. They work for both posts and pages, giving you flexibility in how you manage visibility.
However, these restrictions are applied on a per-page or per-post basis. WordPress does not have a built-in way to password-protect your entire site in bulk. If your website contains hundreds or thousands of pages, manually setting visibility for each one can be very time-consuming and impractical.
For small sites, these settings may be enough. However, for larger projects, a more efficient method is needed to protect content without editing every page individually, as seen in the examples that follow.
Also Read: What are the Visibility Options in WordPress? [Ultimate Guide 2025]
Alternatively, if you just want to prevent search engines from indexing your site, navigate to Settings >> Reading >> Check the “Discourage search engines from indexing this site” box.

⚠️ Important Clarification: This setting does not hide your site from visitors. Anyone with the link can still access it. It simply asks search engines not to index your content, and they can still ignore this request.
If you have a large site and want site-wide protection, you’ll need a plugin or server-level restriction instead of relying on WordPress’s built-in visibility settings.
4. Enable Maintenance Mode with a Plugin
Maintenance mode plugins allow you to hide your WordPress site from public view while still working on it in the background. Instead of showing unfinished pages or broken layouts, visitors see a custom maintenance or “coming soon” page.
These plugins work by temporarily replacing your site’s front end with a holding page.
Meanwhile, you and other logged-in users with sufficient permissions can view and work on the site. Making them an ideal choice when redesigning, fixing technical issues, or launching a new project.
Some popular maintenance mode plugins include:
- SeedProd.
- WP Maintenance Mode & Coming Soon.
- Under Construction Page.
- Or you can choose any one you like.
Most of these plugins are simple to set up.
All you have to do is install the plugin, choose a template, and activate maintenance mode with a single click. Many also allow you to add branding, contact forms, or countdown timers to keep visitors informed.
The setup is super easy. Here’s why it’s a fantastic choice.
- Setup takes a few clicks: No coding or technical skills required. Most can be set up in minutes through the WordPress dashboard. This makes them beginner-friendly and accessible to non-developers.
- Customizable designs: You can match the look of the maintenance page to your brand. A consistent design reassures visitors that the downtime is planned and temporary.
- Selective access [Some plugins]: You can allow only certain user roles or specific IP addresses to view the actual site. This lets you share a work-in-progress with clients or team members without making it public.
However, there are downsides as well. Such as:
- Plugin dependency: Your site relies on the plugin to stay hidden. If the plugin is deactivated, your site becomes visible.
- Potential compatibility issues: Some plugins may conflict with themes or other plugins, requiring testing before use.
⚠️ Before Using Maintenance Mode:
- If your site uses caching or a CDN (e.g., Cloudflare), purge the cache after enabling maintenance mode. Otherwise, visitors may still see the old live site.
- Maintenance mode does not block search engines unless the plugin specifically has that feature enabled. For sensitive content, use password protection instead.
If you need a simple, ongoing way to block public access, the next method—and the last one—offers a more straightforward approach and is the best option for WordPress users, regardless of the number of pages or posts.
5. Use a WordPress Password Protection Plugin
For the simplest and most reliable way to hide your WordPress site from the public, use a WordPress plugin.
Several WordPress plugins offer password protection, but only one stands out as the most reliable and easy-to-use. It’s Password Protected plugin.
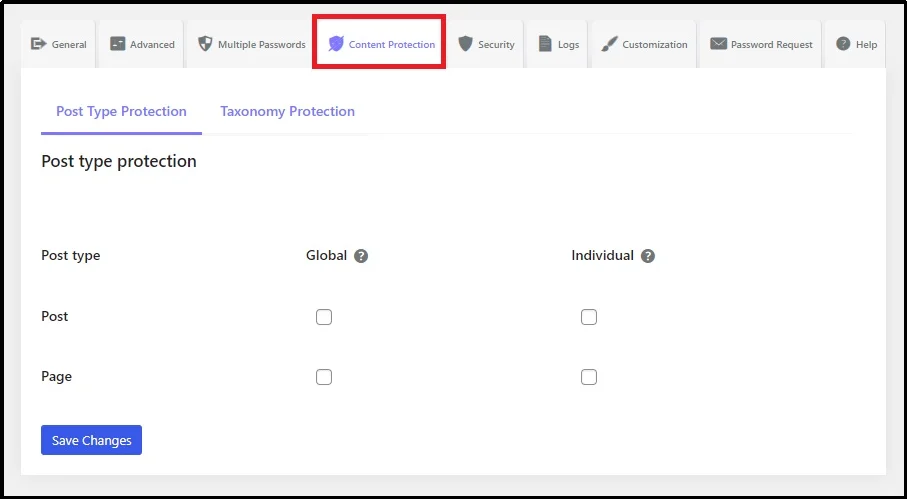
Unlike built-in WordPress password settings, which only work on individual pages or posts, this plugin can protect your entire site with a single password. This means no matter how many posts or pages you have, you can secure them all instantly.
However, if you plan on protecting pages individually, you can do so as well. Just head over to the plugin’s settings >> Content Protection tab >> Post Type Protection subtab.
Check the box to protect either individually or globally (one password protects all).
This article can help you further:
How to Hide a Page in WordPress: 4 Methods You Can Use Today
Password Protected is lightweight, easy to set up, and does not require any coding knowledge.
Once installed, you can enable site-wide protection in just a few clicks. Visitors will see a password prompt before they can view any content, and you can control who has access by sharing the password only with approved users.
But the plugin does more than just password-protect your content. It includes:
- User role exemptions – Allow certain logged-in roles to bypass the password screen automatically.
- IP address whitelisting – Grant access to trusted IPs without requiring a password.
- Excellent security features – Password Protected supports advanced security features, such as login attempt limits, reCAPTCHA, WP-admin protection, and more. Preventing common WordPress attacks.
- Comprehensive activity tracking – Monitor all password attempt activity in one place. View IP address, the browser they used, the time of the attempt, and more important metrics that can’t be ignored.
- Password request – Let visitors request a password directly from the protected page, streamlining the access process without manual back-and-forth.
- Password screen customization – Customize your password-protected screen to match your overall brand’s aesthetics. Here’s how to.
These features give you flexibility, whether you want to protect a staging site, control access to a membership platform, or keep sensitive business information private.
Compared to technical methods like .htaccess or hosting-level restrictions, Password Protected offers a beginner-friendly solution that still provides better control over who can view your site.
It is quick to configure, works regardless of your hosting environment, and is ideal for both small and large sites.
Final Words
Hiding your WordPress site from the public allows you to decide who gets access, when they see your content, and how your site appears when it’s finally ready to launch.
From highly technical .htaccess edits to simple plugin-based solutions, there’s a method for every skill level and situation.
The most important thing is choosing a method that matches both your needs and your technical comfort. An overly complex approach could cause downtime or lock you out of your own site.
Before you make your site public, take the time to ensure that only the right eyes can see it.
If you’re looking for a simple, fast, and reliable all-in-one solution, Password Protected is the best choice for keeping your WordPress site hidden until you are ready to make it public. Get Password Protected now!
Frequently Asked Questions
How do I make my WordPress site not visible?
You can restrict access using methods like .htaccess rules, hosting panel settings, or a plugin such as Password Protected to block visitors.
How do I make my WordPress site unsearchable?
Enable the “Discourage search engines from indexing this site” option in Settings >> Reading to prevent indexing.
How do I temporarily hide my WordPress website?
Use a maintenance mode or password protection plugin to hide the site until you’re ready to make it public again.