
Want to get rid of that uninteresting screen that offers no colors or excitement to the potential customer?
Although password protection is a fantastic feature that can be useful in several instances, more on this in a minute, it offers a very basic appearance that is just not good to look at.
Put yourself in the shoes of the visitor, suppose you land on a vibrant website, you want to access a password-protected screen, but as soon as you click on it, a bland screen with nothing but an input box appears, suddenly making the visitor wonder whether they are on the even in on the correct website.
Conversely, something as small as adding your brand’s logo and colors can ensure visitors that they are, in fact, where they need to be.
This article explores how to style a password-protected page in WordPress. Before that, let’s understand password-protected pages and what they do and why it is imperative to style them.
Understanding Password-Protected Pages
WordPress has a built-in feature that lets you protect any post or page with a password. This means only people who know the password can view the content. However, the downside is that the functionality is limited, and you can’t customize the page.
When you create or edit a page or post, look for the “Visibility” option in the sidebar or under the “Publish” settings. By default, this is set to “Public.” If you click “Edit,” you’ll see three choices: Public, Private, and Password Protected. Choose “Password Protected,” enter your desired password, and update or publish the page.
This is useful in many situations. You might want to hide content from the general public, offer early access to selected users, or protect private pages for clients or team members.
However, while this feature is helpful, the default password page is very plain. It doesn’t match the rest of your site and can feel out of place. There’s no logo, branding, or helpful message to guide users through. This can confuse visitors or strike your site’s professionalism.
Therefore, it’s easier to use the better alternative: The Password Protected plugin.
Why Use The Password Protected Plugin?
While WordPress does offer a basic way to protect pages with a password, it comes with several limits. You can’t choose exactly what parts of your site to protect, and you definitely can’t change the way the password screen looks.
That’s where the Password Protected plugin becomes a much better option.
With this plugin, you get full control over what you want to protect. You’re not just limited to individual posts or pages. You can protect:
- Entire categories
- Specific Post/Page
- WooCommerce products
- Custom post types
- And much more
This gives you far more flexibility than the default WordPress feature. For example, if you’re running a store, you can hide certain products from public view unless the visitor enters the password. If you run a blog, you can protect an entire category of posts instead of locking each post individually.
Another significant benefit is complete customization.
As discussed, the default WordPress password screen is plain, with no style or branding. The plugin allows you to design that screen however you like. You can add your logo, brand colors, images, and much more.
In short, whether you’re looking to hide content for members, limit access to clients, or run a private store section, the Password Protected plugin makes it easy, secure, and stylish.
Protect a Page/Post With Password Protect
Before styling a page, let’s see how you can protect it with a password.
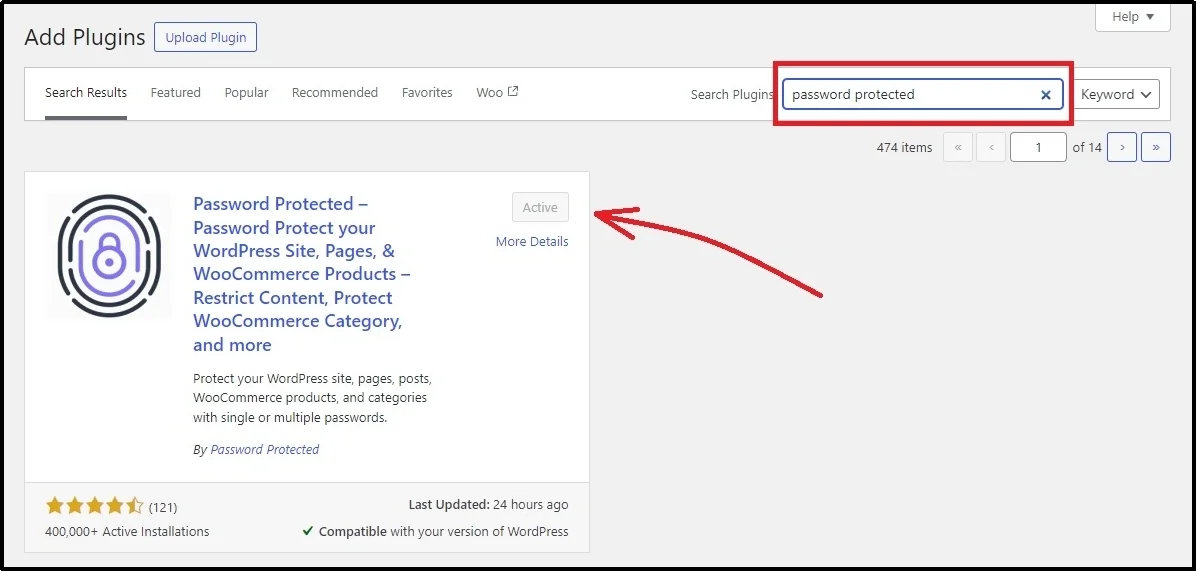
Install the Password Protected plugin.
Log in to WordPress ⇒ Plugins ⇒ Add Plugin ⇒ Search for Password Protected. Install and activate the plugin.
Go to the plugin’s settings. Here’s how the interface looks like.
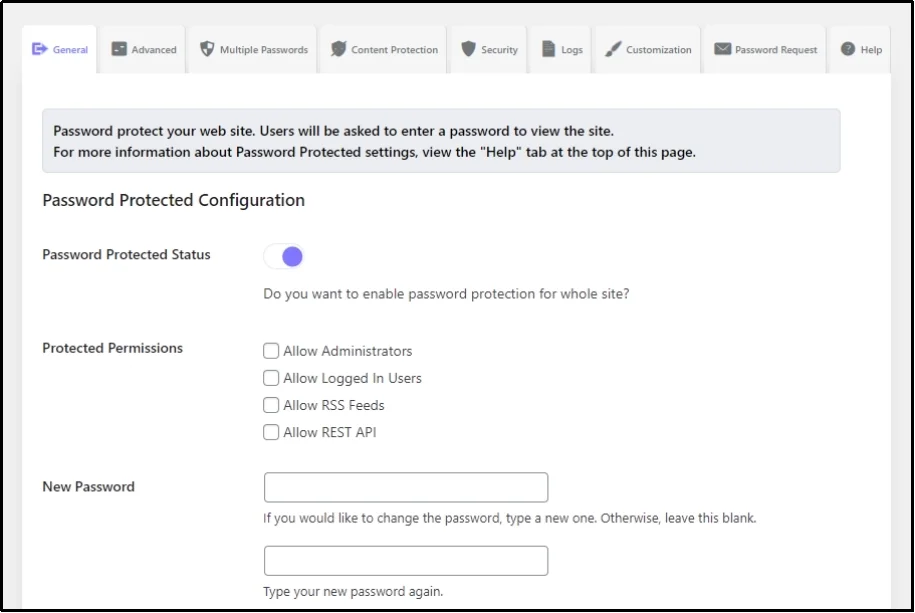
Now, switch to the Content Protection tab.
Check the box that you want to protect. Checking the box in the global column will protect the post as a whole. Simply put, if checked, you don’t have to protect each post individually—unlike the WordPress default protection feature.
Alternatively, you can protect one out of all as well. Just check the individual check. Go to the Post, scroll down to the end, check the password protection box, and enter the unique password.
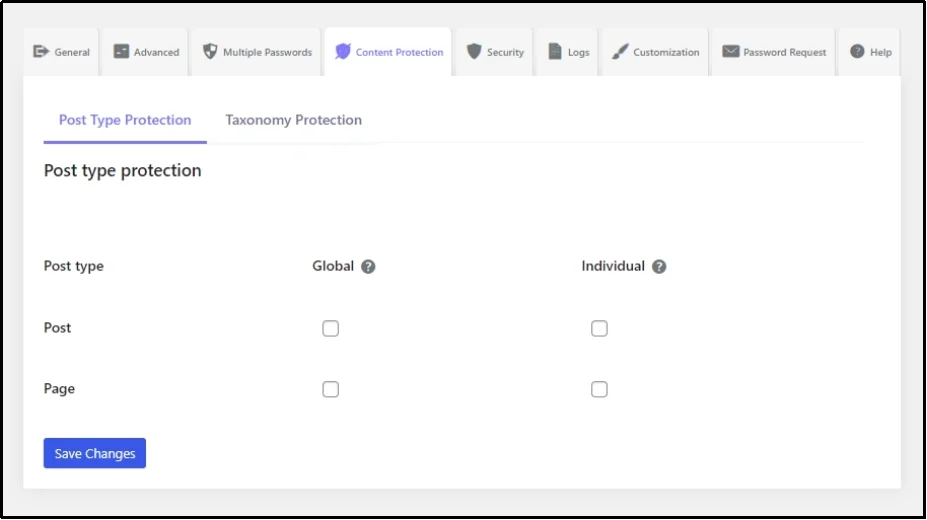
Save changes, and now your post is protected with a password.
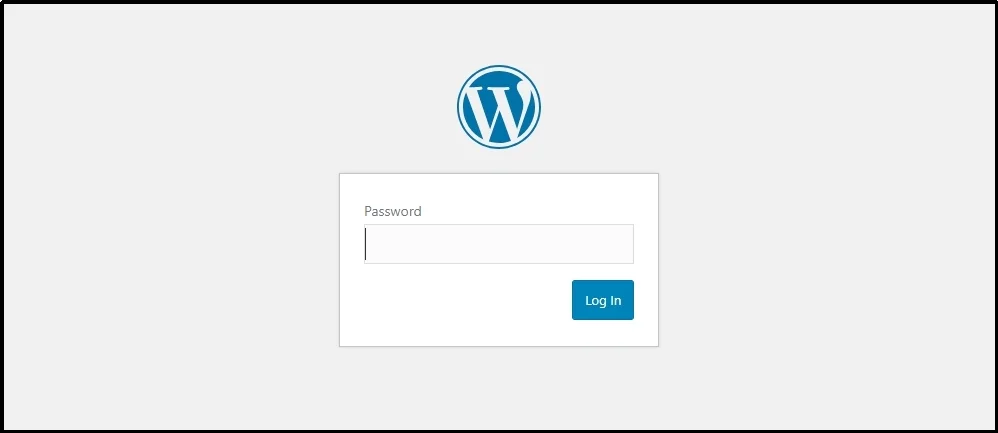
Here’s how the screen looks.
Also Read: How to Hide a Page in WordPress: 4 Methods You Can Use Today
Now, let’s transform it!
Step-by-Step Process to Style a Password Protected Page in WordPress
The plugin offers complete customization, including logo settings, label styles, field settings, text styles, button settings, label settings, background settings, and much more.
Note: This feature is only available in premium plans. Upgrade today to use customization and many more amazing features.
Let’s start with the logo.
Navigate to the Customization tab.
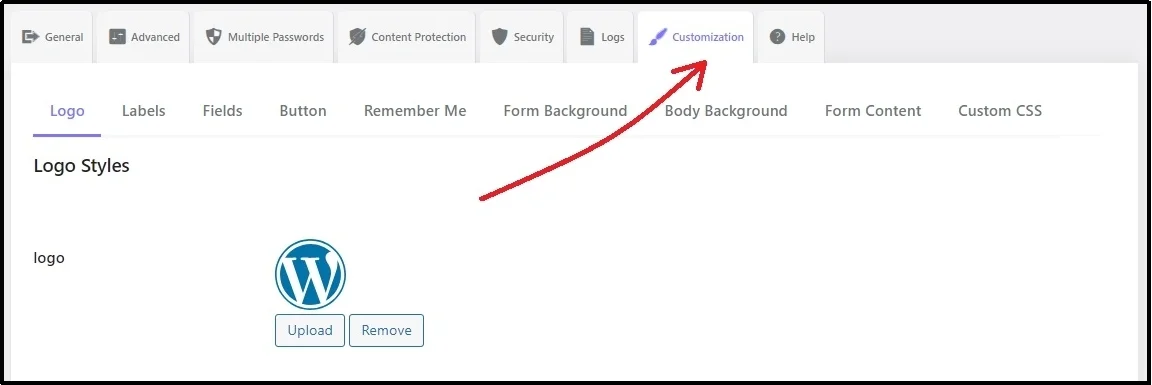
You will land on the subtab “Logo.”
You can change the WordPress logo and replace it with your brand’s. To do so, use the Upload button and change the logo’s width and height using the sliders.
Furthermore, you can also choose where the visitor should land in case they click the logo. Use the Redirect URL drop-down to route the visitor wherever you want.
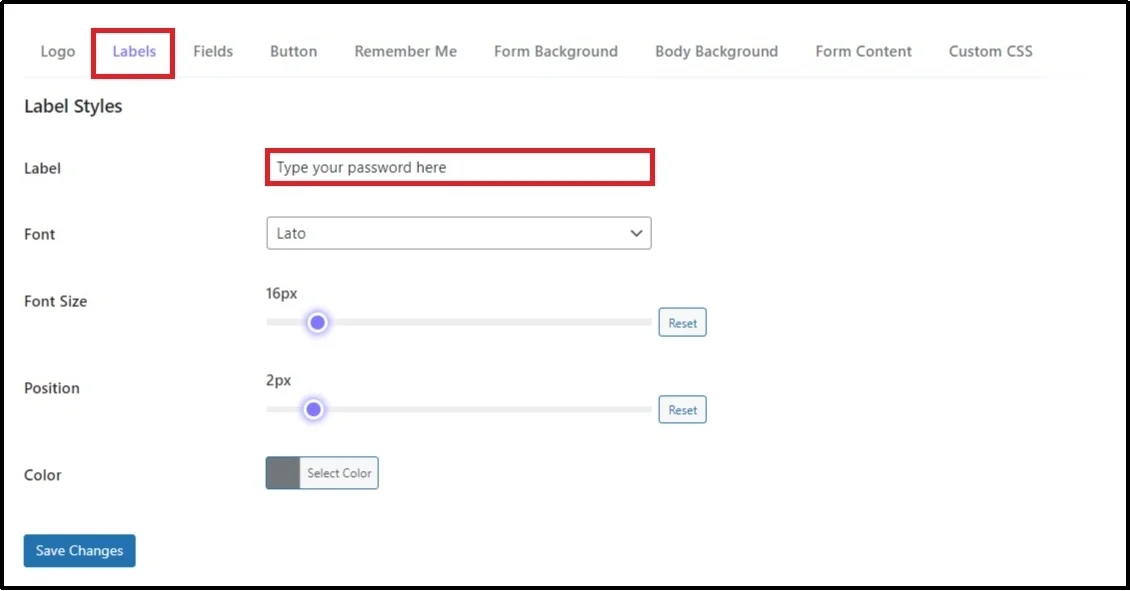
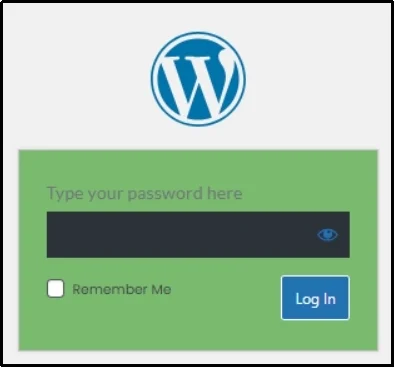
Talking about details, Password Protected enables you to change the label of the input box. Go to the Labels tab and fill the input box with what you want the visitor to see.
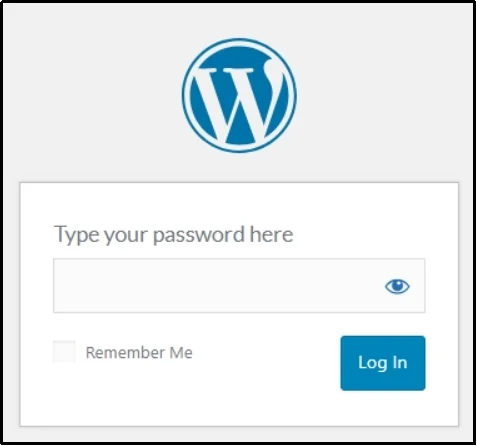
In the image below, you can see, we have replaced the “Password” with “Type your password here.”
Here is how it should look.
Choose the font from the following drop-down. Set the font size, position, and color.
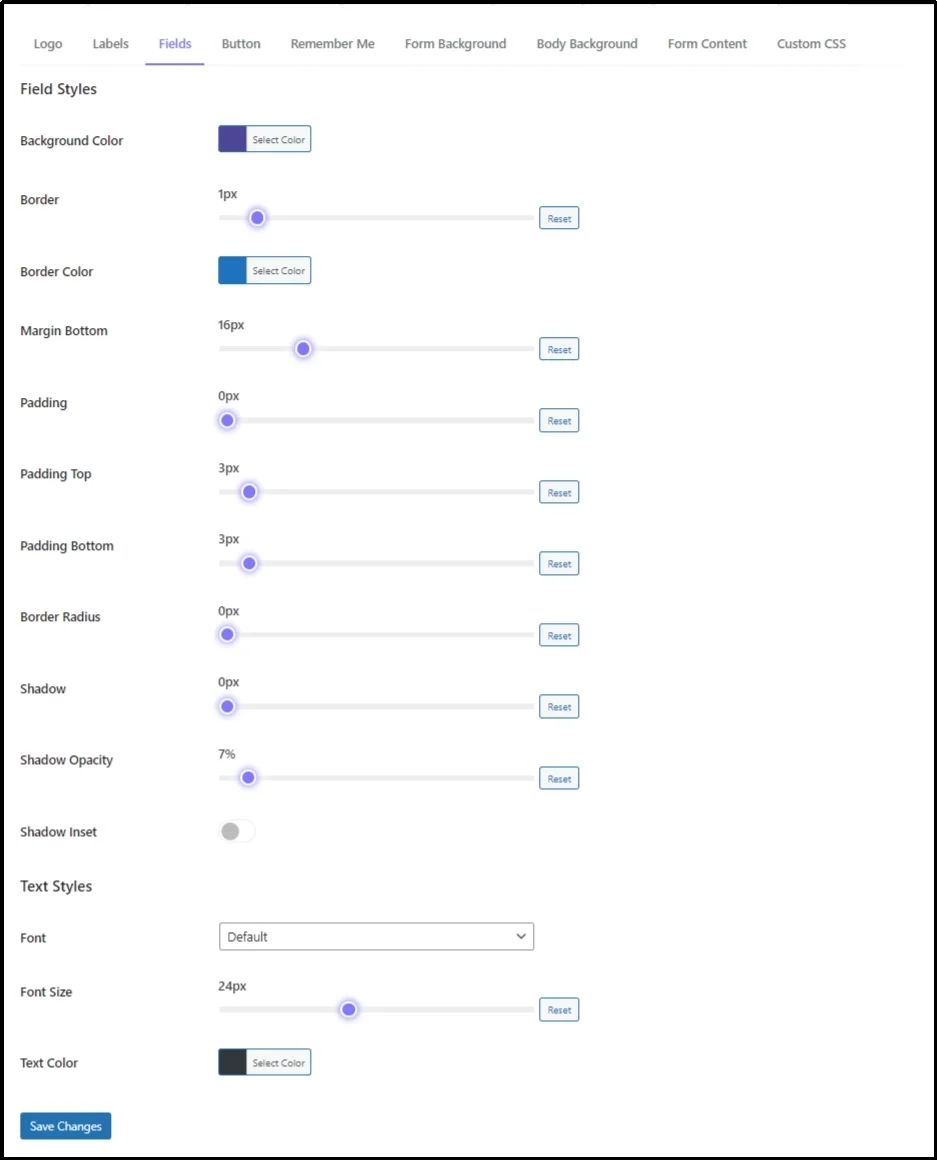
Moreover, you can also change the field of the input box and make it much more appealing by solidifying the borders, changing the alignment, font, font size, text color, or adding a shadow.
Just switch to the “Fields” tab. Choose the color, border’s color and customize the field however you want.
Next, you can customize this tiny button that enables logging in upon clicking on the “Button” tab. Similar, select the color, border color, and alignment.
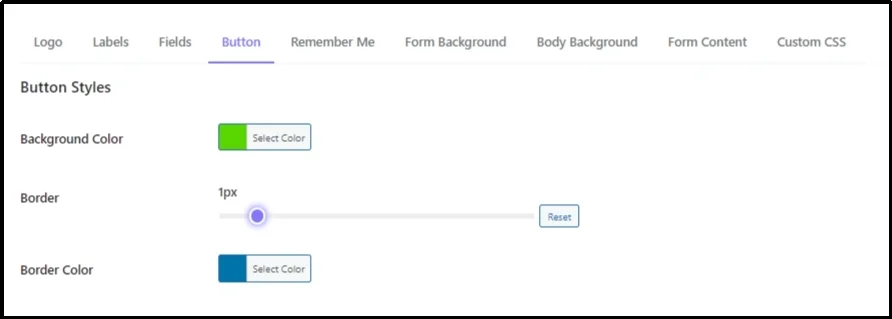
Here’s how the button will look after customization.

Similarly, you can also customize the Remember Me button next to the customized Log In button. This tiny checkbox has a dedicated subtab, just switch to it and adjust it however you wish.
Next, move on to the Form background or the screen behind the password screen.
The interface is similar for this tab as well. All you have to do is switch to the dedicated “Form Background” subtab and change the settings according to your standards.
Let’s do it together.
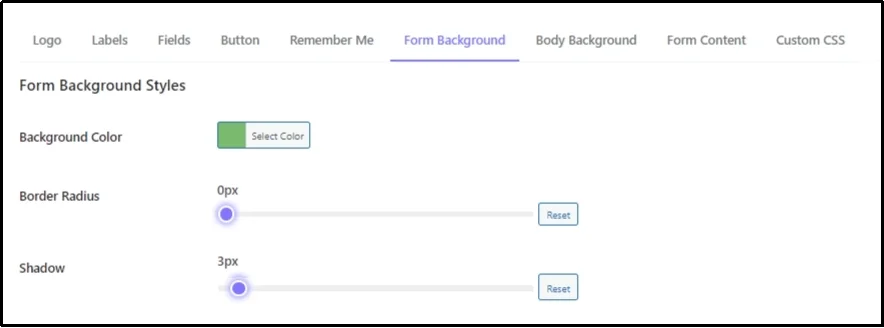
After changing the color, adding a shadow and playing around with settings, here’s how the background turns out.
There is much more to explore!
Final Words
A password-protected page is a part of your website, and it deserves just as much attention as any other page. In fact, it might even be more important because it often hides your premium, private, or exclusive content.
The way it looks can shape a visitor’s first impression of your brand’s professionalism and trustworthiness.
Password Protected gives you complete control. You can protect exactly what you want and design the password screen to feel like it naturally belongs on your site. From uploading your logo to changing fonts, button styles, input fields, and even the background, every detail counts.
Customization is not just about aesthetics. It helps reassure visitors that they’re in the right place, builds trust, and maintains your brand’s integrity across the site. An appealing design makes even the smallest interaction, like entering a password, feel smooth and intentional.
Frequently Asked Questions
Can I change fonts on a password-protected page?
Yes you can! Password Protected offers complete customization including the font, size, shadow, borders, and much more. Install the plugin, switch to the customization tab, and go to the respective tab of text that you want to change the font of.
Will my password form styling affect all protected pages site-wide?
Yes! With Password Protected, you can say goodbye to the hassle of customizing each page individually. Just customize the page once, and you are good to go across the site.
Can I protect WooCommerce products with Password Protected?
Absolutely! One of the best things about the Password Protected plugin is that it lets you protect WooCommerce products, categories, and even custom post types. You don’t have to rely on third-party extensions or workarounds. Just install and check the right boxes, and you’re done.
Do I need coding skills to customize the password page?
Not at all. The Password Protected plugin is built for ease of use. All customization options are available in a visual, tab-based interface. You can change colors, upload a logo, set fonts, and adjust styles, all without writing a single line of code.