WordPress powers more than 40% of the web, making it a constant target for malicious attacks. In fact, reports suggest that over 90,000 hacking attempts are made on WordPress sites every minute.
Thus, cybersecurity becomes non-negotiable.
Securing your WordPress installation isn’t just about installing a few plugins or setting strong passwords. It involves building multiple layers of defense.
This defense can start with protecting sensitive directories from unauthorized access. But…how can you do it?
There are two ways to do so.
This guide explores both. We’ll walk you through what the .htaccess file is, why password protecting your site with it is necessary, how to do it in three super simple steps, and a better way to secure your WordPress website.
Let’s begin with what this file actually is.
What is a .htaccess File?
The .htaccess file is a powerful configuration file used by Apache web servers. It lets you control how your server behaves at the directory level without needing direct access to server settings.
It is located in the root folder of your WordPress installation, typically in the /public_html/ folder. This file allows you to override default server rules. You can use it to:
- Redirect URLs
- Force HTTPS connections
- Block specific IP addresses
- Enable browser caching
- And, as we will learn in this article, restrict access with a password
Because of its ability to define access rules, the .htaccess file becomes a crucial tool for hardening WordPress security, especially when you want to limit entry to sensitive areas like /wp-admin/ or other necessary subdirectories.
Why Password Protect WordPress Directory with .htaccess?
Securing specific WordPress directories can drastically reduce the exposure to attackers. Here’s why using .htaccess to password protect directories is worth considering:
- Blocks Unauthorized Access to Sensitive Areas. Necessary documents, such as /wp-admin/ and /wp-includes/, contain critical site files. Without protection, anyone with the right URL can attempt brute-force or other password-guessing attacks.
- Prevents Automated Bot Attacks. Bots constantly scan WordPress directories looking for weak spots. Password protection acts as an additional barrier, stopping most automated scripts before they attack.
- Add a Layer of Defense Against Zero-Day Exploits. Even well-maintained sites can be vulnerable to undisclosed flaws. Directory-level protection gives you extra time and control to respond before such vulnerabilities can be exploited.
- Keep Development or Staging Environments Hidden. Many developers run staging or developer versions of their sites in subdirectories. Without password protection, these versions can become entry points for attacks.
- Control Access During Maintenance or Site Migration. When your site is under construction, being moved, or undergoing testing, .htaccess protection ensures that only you and your team can access it, keeping visitors and search engines out until you’re ready.
3 Easy Steps to Password Protect WordPress Directory with .htaccess
Even though it sounds technical, the process is easy. It involves creating two files, such as .htaccess and .htpasswd, and then uploading them to the wp-admin directory.
Let’s do it.
Step 1. Create .htaccess File
You can create both files in any text editor. However, it is important to note that creating a file and adding it to the WordPress directory may cause technical conflicts. Therefore, ensure to make a backup of your site before starting the procedure.
After backing it up, open any text editor of your choice and name the file as .htaccess.
Copy the following code and add it to the file.
AuthName “Admins Only”
AuthUserFile location of .htpasswd
AuthGroupFile /dev/null
AuthType basic
require user enterusername
Make sure to change the “location of .htpasswd” file with the location where you will upload the .htpasswd file, for example “public_html/wp-admin/.htpasswd”, and replace the “enterusername” with the username you want to use for login.
Save the file and let’s move on to the next step.
Step 2. Create a .htpasswd File.
Similarly, open the text editor again and name the file “.htpasswd”
This file stores your username and password in an encrypted format.
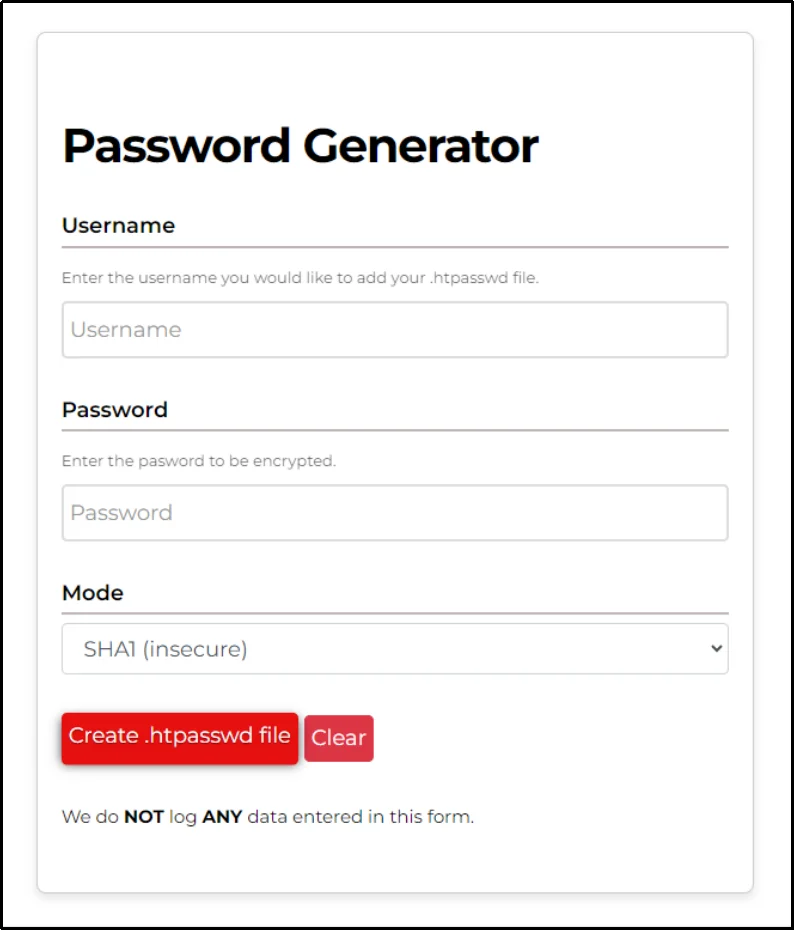
To create the encrypted password file, go to any .htpasswd generator. You can find plenty of them on the web. We are using one from Hosting Canada.
Fill out the necessary details, including username, password, and select the mode from the drop-down. Here’s what you can choose from:
- SHA1: This one is considered insecure because it’s vulnerable to collision attacks. Not recommended.
- Apache specific salted MD5 (insecure but common): This hashing algorithm combines the password with a random string before hashing it with the MD5 algorithm.
- Bcrypt (Apache v2.4 onwards): A much stronger password hashing function. It was specifically designed for password hashing and is resistant to brute-force attacks.
- Argon2 (experimental): The strongest one, but experimental. Designed to be memory-hard, which means it requires a lot of memory to compute.
Learn more about password hashing in this article: What is Password Hashing and Why Is It Important?
Once done, click the “Create .htpasswd file” button.
Save the file, and we are ready to upload it.
Step 3. Upload The Files
Open the file manager.
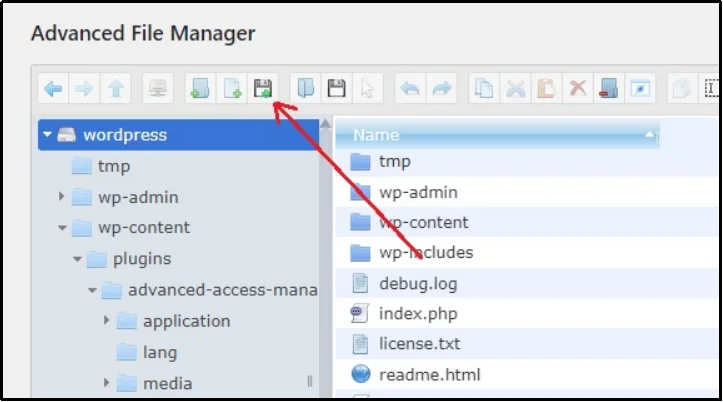
You can use either an FTP client or your cPanel. Alternatively, you can go the easier and better way and use an easy-to-use file manager plugin, such as Advanced File Manager. This one’s hands down the best file manager plugin, and that’s what we use here at Password Protected.
Go to the File Manager and upload the files using the “Upload” button as shown in the screenshot below.
Alternatively, you can take advantage of their drag-and-drop feature and drop the files in the website’s wp-admin folder.
Regardless of how you choose to upload the files, once the files are in the directory, your WordPress website is secured with an additional password.
If all this sounds too much, you can achieve an even better security with Password Protected: A feature-rich plugin that helps with WordPress website protection.
Protect Your Website With a Password Protected WordPress Plugin
Editing server files manually, generating encrypted passwords, and uploading configuration files can be overwhelming if you’re not familiar with how WordPress works behind the scenes. Then the Password Protected plugin is the better and easier choice.
Instead of working with server-level configurations, the Password Protected plugin lets you secure your website directly from the WordPress dashboard.
Here’s what makes it a better alternative:
- Protect Your Entire Site or Specific Pages/Posts. Lock down your whole website or just a few key pages; the plugin allows complete control over what stays public and what gets hidden behind a password.
- Allow/Block IP Addresses. Grant or restrict access based on IPs. Keeping suspicious IPs away keeps the website safe and secure.
- Customizable Protected Screen. Design the password prompt to match your brand. You can add your logo, style the layout, and create a colourful experience for your users. Learn more in this article: How to Style a Password-Protected Page in WordPress [Step-by-Step]
- Bypass URLs for Private Sharing. Share private content via secret links that bypass password protection, a super helpful option for temporary access or client previews.
- Advanced Security Modes. For even more control, you can set expiration times for passwords, enable brute-force protection, and monitor access activity.
Password Protected simplifies everything .htaccess can do, while offering much more. It’s designed to make strong security easier, faster, and more accessible to WordPress users of all levels.
Ready to tighten your site’s access control? Explore the full feature list here and take a step ahead and opt for Password Protected premium for unrestricted protection.
Common Errors While Handling the .htaccess File
Do not panic if you face these common errors that we are about to discuss; adding a few lines of code to the .htaccess file can help you banish them.
Remember: These lines of code must be added to the .htaccess file that resides in the main website folder and not the one we just uploaded to the /wp-admin/.
Ajax Not Working Error
One common error is that Ajax might stop working on your site’s front end. This is fairly common if you have WordPress plugins that require Ajax.
You can easily fix this by adding the following code to the .htaccess file:
<Files admin-ajax.php>
Order allow,deny
Allow from all
Satisfy any
</Files>
404 Error
If you face a “404 error” or a “too many redirects error,” the solution is similar. Just add the following line of code to the .htaccess file located in the root directory of your website.
ErrorDocument 401 default
Final Words
Directory-level protection in WordPress via .htaccess reduces exposure, keeps attackers away, and ensures that only trusted users access sensitive areas. But for many site owners, handling server files and encryption formats can become a hurdle.
That’s why the Password Protected plugin exists.
It brings a better level of protection to your WordPress dashboard without complexity. Whether you’re managing a live site, staging environment, or private client project, this plugin offers a flexible, powerful, and beginner-friendly approach to access control.
To add a password-protected screen to your WordPress login page, install the Password Protected plugin now!
Frequently Asked Questions
How do I password protect a WP admin directory?
You can password protect the WordPress admin directory by creating .htaccess and .htpasswd files and uploading them to the /wp-admin/ directory using your file manager or an FTP client. Alternatively, you can use the Password Protected WordPress plugin that offers much better control over password protection.
Is this method compatible with all hosting providers?
The .htaccess method works only on servers that run Apache, which includes most shared hosting providers. However, if your site is hosted on a server that uses Nginx or a managed platform that restricts direct file access, this method might not work. In such cases, using a plugin like Password Protected is a safer and more compatible option as it doesn’t rely on server configuration and works across all hosting environments.